
“`html
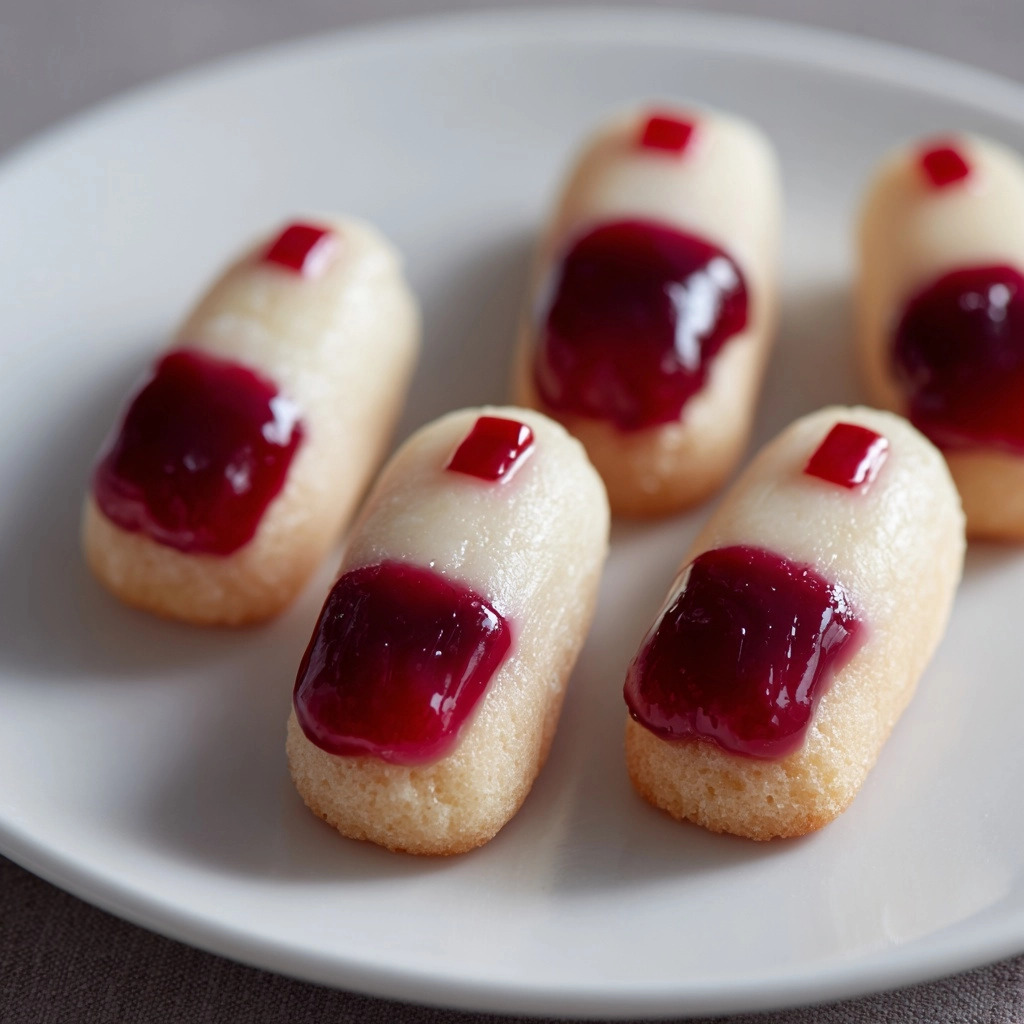
If you are looking for a delightfully spooky yet utterly delicious treat for your Halloween party, the Halloween Zombie Fingers Recipe will be your new go-to! These creepy finger-shaped cookies combine buttery richness with a fun and eerie presentation that will delight kids and adults alike. Each bite offers a tender, buttery cookie with a realistic almond fingernail, blood-red jam, and tiny knuckle slashes that bring the undead straight to your dessert table. Let me take you through this fun and surprisingly simple recipe that will turn your Halloween festivities up a notch with these unforgettable zombie fingers.

Ingredients You’ll Need
This Halloween Zombie Fingers Recipe uses a few basic pantry staples that come together beautifully to create both flavor and that authentic creepy effect. Each ingredient is essential, from the buttery dough that gives a soft, melt-in-your-mouth texture to the almonds and red gel that deliver the spooky visual impact.
- 1 cup unsalted butter, softened: Provides a rich and tender crumb for the cookie dough.
- 1 cup powdered sugar: Adds sweetness without graininess for a smooth texture.
- 1 egg: Binds the ingredients and adds moisture to the dough.
- 1 teaspoon vanilla extract: Enhances the cookie’s flavor with warm, sweet notes.
- 2 2/3 cups all-purpose flour: Gives structure to the dough, helping the cookies hold their spooky shapes.
- 1/2 teaspoon baking powder: Lightens the dough slightly for a tender bite.
- 1/4 teaspoon salt: Balances the sweetness and boosts flavor.
- 1/2 cup whole almonds: Perfect for creating realistic “fingernails.”
- Red gel food coloring or strawberry jam: Creates the creepy bloody effect under and around the almond nails.
- Green food coloring (optional): Adds a sickly hue to the dough for an extra zombie-like appearance.
How to Make Halloween Zombie Fingers Recipe
Step 1: Creaming the Butter and Sugar
Begin by beating the softened butter and powdered sugar together in a large bowl until the mixture is light, fluffy, and creamy. This step is crucial because it not only aerates the dough but also sets the stage for a tender, melt-in-your-mouth cookie that’s a joy to bite into.
Step 2: Adding Egg and Vanilla Extract
Next, beat in the egg and vanilla extract until everything is fully incorporated. These ingredients bring moisture and a lovely fragrance, elevating the flavor while helping the dough come together smoothly.
Step 3: Mixing Dry Ingredients
In a separate bowl, whisk together the all-purpose flour, baking powder, and salt. This ensures even distribution of leavening and seasoning, essential for perfectly textured fingers with no uneven spots.
Step 4: Combining Wet and Dry Ingredients
Gradually add the dry ingredients into the wet mixture, mixing until a dough forms. If you want your zombie fingers to have that eerie green tint, now is the time to add a few drops of green food coloring and knead it evenly until the dough reaches your desired shade.
Step 5: Chilling the Dough
Divide the dough into two pieces, wrap them in plastic wrap, and pop them in the fridge for at least 30 minutes. Chilling firms up the dough, making it much easier to roll and shape those creepy fingers without the dough sticking or losing its form.
Step 6: Shaping the Fingers
Once chilled, preheat your oven to 350°F (175°C) and line a baking sheet with parchment paper. Roll heaping tablespoons of dough into finger shapes that are slightly thinner than a real finger. Press a whole almond gently at one end to form a “fingernail.” Use a sharp knife to make small horizontal slashes across the dough where the knuckles should be, adding authenticity to your zombie appendages.
Step 7: Baking to Perfection
Bake the fingers for 12–15 minutes until they are just lightly golden. Keep an eye on them to avoid over-browning — you want them looking slightly pale, like true zombie fingers freshly dug up from the graveyard.
Step 8: Adding the Bloody Details
When the cookies have cooled slightly, gently lift off each almond and smear a dab of red gel food coloring or strawberry jam underneath before replacing the almond to create a bloodied nail effect. You can also use the red gel to dab around the knuckle slashes for an extra gory and authentic look that will wow your guests.
How to Serve Halloween Zombie Fingers Recipe
Garnishes
For an extra spooky touch, sprinkle a little cocoa powder or delicately drizzle melted dark chocolate over the knuckles after baking to deepen those creepy lines. A light dusting of powdered sugar can also look like an eerie tomb dusting if you like contrast.
Side Dishes
Pair these spooky treats with a bowl of creamy pumpkin soup or a pitch-black blackberry punch to complement their eerie theme. They also work wonderfully alongside ghost-shaped meringues or witch finger-shaped pretzels for a full Halloween spread that’s as fun to eat as it is to look at.
Creative Ways to Present
For a truly chilling presentation, arrange the Halloween Zombie Fingers Recipe on a platter lined with lettuce or kale to mimic creepy moss and dirt. Add a few plastic spiders or small Halloween props for effect. Serving them sticking out of a “gravesite” cake or in a cobwebbed jar also adds delightful creepy flair.
Make Ahead and Storage
Storing Leftovers
Store any leftover zombie fingers in an airtight container at room temperature for up to 3 days to maintain their freshness and crisp edges. Keep them away from heat and moisture to preserve their spooky appearance and buttery texture.
Freezing
You can freeze the shaped cookie dough before baking. Wrap the dough logs tightly in plastic wrap and store them in a freezer-safe bag for up to one month. When ready to use, thaw overnight in the refrigerator and continue with shaping and baking as instructed.
Reheating
If you want to gently warm the cookies, pop them in a preheated oven at 300°F for about 5 minutes. This refreshes their texture and intensifies the buttery aroma without melting the almond nails or blood details.
FAQs
Can I make the dough ahead of time?
Absolutely! The dough can be prepared a day in advance and refrigerated to allow the flavors to develop. Just make sure to wrap it tightly so it doesn’t dry out. This helps you save time on the day of your Halloween party.
What else can I use besides almonds for fingernails?
If you’re allergic or want a variation, pumpkin seeds or sliced pistachios can make great alternatives. Just press them lightly into the dough to achieve a similar nail-like effect.
How can I make these cookies vegan?
To make a vegan version, substitute the butter with a plant-based vegan butter and use a flax egg (1 tablespoon flaxseed meal + 3 tablespoons water) instead of a regular egg. The texture might be slightly different but still delicious!
What if I don’t have red gel food coloring?
Strawberry or raspberry jam works beautifully to mimic the blood effect if you don’t have red gel. Simply dab a little jam underneath the almond fingernails and around the knuckles for an equally gory touch.
Can I make these gluten-free?
Yes, swap the all-purpose flour for a gluten-free flour blend designed for baking. Keep in mind the texture might be a bit different, but with the right blend, the zombie fingers will still turn out tasty and fun.
Final Thoughts
I hope this Halloween Zombie Fingers Recipe inspires you to add a little spooky magic to your celebrations. They’re fun to make, delightfully creepy to look at, and absolutely delicious to eat. So, roll up your sleeves, grab your ingredients, and get ready to impress everyone with these undead treats that truly bring Halloween to life on your dessert table!
“`
Print
Halloween Zombie Fingers Recipe
- Prep Time: 20 minutes
- Cook Time: 15 minutes
- Total Time: 35 minutes
- Yield: 24 fingers
- Category: Dessert
- Method: Baking
- Cuisine: American
- Diet: Vegetarian
Description
These Halloween Zombie Fingers are spooky, fun, and perfect for your Halloween dessert table. Crafted from buttery cookie dough shaped like creepy severed fingers, accented with almond fingernails and a blood-like effect from red gel or strawberry jam, they offer a delightfully eerie treat that’s both tasty and visually striking.
Ingredients
Cookie Dough
- 1 cup unsalted butter, softened
- 1 cup powdered sugar
- 1 egg
- 1 teaspoon vanilla extract
- 2 2/3 cups all-purpose flour
- 1/2 teaspoon baking powder
- 1/4 teaspoon salt
- green food coloring (optional for dough tint)
Decorations
- 1/2 cup whole almonds (for fingernails)
- red gel food coloring or strawberry jam (for blood effect)
Instructions
- Prepare the dough: In a large bowl, cream together the softened butter and powdered sugar until the mixture is light and fluffy. Beat in the egg and vanilla extract thoroughly until fully combined.
- Mix dry ingredients: In a separate bowl, whisk together the all-purpose flour, baking powder, and salt. Gradually add this dry mix to the wet ingredients, stirring until a cohesive dough forms. If desired, add a few drops of green food coloring and knead until the dough is evenly tinted a sickly green.
- Chill the dough: Divide the dough into two pieces, wrap each in plastic wrap, and refrigerate for 30 minutes to firm up, making shaping easier.
- Preheat oven and prepare baking sheet: Heat your oven to 350°F (175°C). Line a baking sheet with parchment paper to prevent sticking.
- Shape the fingers: Roll heaping tablespoons of dough into finger shapes, slightly thinner than a real finger for a realistic look. Press a whole almond into one end of each finger to serve as the fingernail. Using a knife, make small horizontal slashes across the knuckle areas to add texture and realism.
- Bake: Arrange the shaped fingers on the prepared baking sheet, spacing them slightly apart. Bake in the preheated oven for 12 to 15 minutes, or until the cookies are lightly golden around the edges.
- Add the bloody effect: Remove the fingers from the oven and allow them to cool slightly. Carefully lift off each almond, dab a small amount of red gel food coloring or strawberry jam underneath it, and replace the almond to create a bloody nail effect. Additionally, dab red gel around the knuckle slashes for a gory appearance.
Notes
- For extra creepiness, tint the dough a sickly green before baking and emphasize the knuckle slashes after baking by lightly dusting with cocoa powder or melted chocolate.
- Almonds with the skin on provide a more realistic, eerie fingernail look than blanched almonds.
- These cookies can be stored in an airtight container at room temperature for up to 5 days.

