
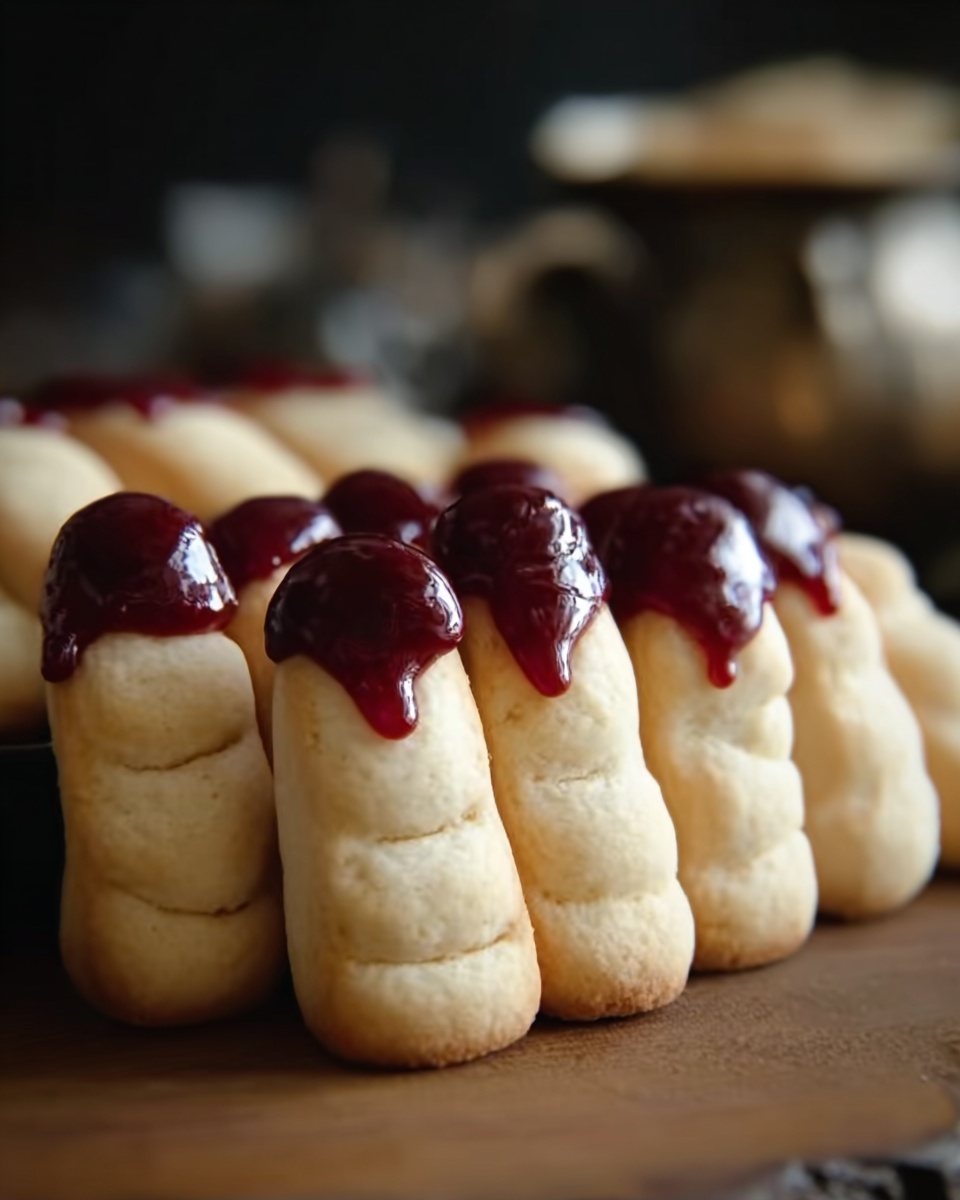
If you’re craving a spooky treat that’s as delightful to make as it is to eat, this Witch Finger Cookies Recipe is an absolute must-try. These creepy-cute cookies look like enchanted fingers straight out of a haunted forest, complete with knuckles and blood-red almond nails. But don’t let their eerie appearance fool you—each bite is buttery, sweet, and perfectly crumbly with a subtle almond flavor. They’re the star of every Halloween party or anytime you want to add a dash of wicked fun to your baking. Trust me, once you try this Witch Finger Cookies Recipe, it will quickly become one of your seasonal favorites.
Ingredients You’ll Need
The magic behind this Witch Finger Cookies Recipe comes down to a handful of simple, yet essential ingredients that work together for the perfect texture and flavor. Each item plays a special role—from the creamy butter that makes the dough tender to the almond flour that gives these fingers their signature nutty depth and soft crumb.
- 48 whole blanched almonds: These become the chillingly perfect painted fingernails that add both crunch and character to each cookie.
- 2 tsp red gel food coloring: For painting the almonds to give them that realistic, bloodied nail look—gel coloring works best for vivid, long-lasting color.
- 8 oz unsalted butter, room temperature: Provides richness and keeps the cookies tender without overpowering the delicate almond flavor.
- 8 oz powdered sugar (2 cups): Adds just the right amount of sweetness and helps create a smooth dough texture.
- 1 large egg, room temperature: Binds the ingredients together while keeping the dough moist and easy to shape.
- 1 tbsp vanilla extract: Brings warmth and subtle depth of flavor to balance the almond notes.
- 2 tsp almond extract: Intensifies the almond essence for that signature spooky-sweet taste.
- 15 oz all-purpose flour (3.5 cups): Gives structure to the dough, ensuring the cookies hold their eerie finger shape.
- 2.5 oz almond flour (¾ cup): Boosts the almond flavor and adds a slightly moist, tender crumb.
- 1 tsp salt: Enhances all the flavors so nothing tastes flat or one-dimensional.
How to Make Witch Finger Cookies Recipe
Step 1: Prepare the Almond Fingernails
Start the spooky transformation by turning ordinary almonds into creepy red fingernails. Using a small, food-safe paintbrush, carefully dab red gel food coloring onto the top of each almond. This initial step brings these chilling digits to life by adding a splash of “blood.” Then, let the painted almonds dry completely on a paper towel—this might take a few hours but can be done ahead of time, making your baking day smoother.
Step 2: Preheat and Prep the Oven
Now, set your oven to 350 degrees Fahrenheit (175 degrees Celsius) and line several baking sheets with parchment paper. This simple preparation ensures your Witch Finger Cookies bake evenly and won’t stick, preserving every creepy knuckle and wrinkle in perfect detail.
Step 3: Combine the Dry Ingredients
In a medium bowl, whisk together the all-purpose flour, almond flour, and salt. This mixture forms the backbone of the cookie dough, delivering the perfect balance between sturdy shape and tender crumb. Setting the dry ingredients aside now keeps things organized for the next delicious step.
Step 4: Cream the Butter and Sugar
In your large mixing bowl, cream together the softened butter and powdered sugar until the mixture is light and fluffy. This step is crucial for a melt-in-your-mouth texture. The creaming process traps air, making sure your cookies aren’t dense but pleasantly soft and buttery with every bite.
Step 5: Add the Wet Ingredients
Next, mix in the egg, vanilla extract, and almond extract to the creamed butter and sugar. The egg binds everything seamlessly, while the almond and vanilla extracts add layers of flavor that turn ordinary dough into a bewitching indulgence.
Step 6: Bring the Wet and Dry Together
Slowly add the flour mixture to the wet ingredients, mixing just until combined. Be gentle here—overmixing can develop gluten and make your cookies tough. The aim is a dough that’s soft but holds its shape when rolled into fingers.
Step 7: Shape the Witch Fingers
Take walnut-sized portions of dough and roll each into a long, thin snake that resembles a finger. Place them on your prepared baking sheets, then press your finger down the middle of each dough snake to create knuckles. Use a toothpick to carve subtle lines above and below the knuckles, giving each finger a creepy, wrinkled look.
Step 8: Attach the Fingernails
Press one red-painted almond onto the tip of each cookie dough finger. This is the moment your Witch Finger Cookies start to come alive! The contrast between the pale dough and the vivid red “nail” is the perfect eerie touch.
Step 9: Bake and Cool
Bake the cookies in your preheated oven for about 10 minutes. You’re looking for edges that are just turning firm while keeping the cookies pale, not browned. Once baked, let them cool completely on the baking sheets so they set into their spooky finger form.
How to Serve Witch Finger Cookies Recipe

Garnishes
For an even spookier presentation, sprinkle some edible silver glitter dust lightly over the cookies to mimic an eerie shimmer. You could also serve them alongside small bowls of raspberry or strawberry jam as “blood” dips for added drama and a burst of sweet-tart flavor that complements the almond notes beautifully.
Side Dishes
These Witch Finger Cookies pair wonderfully with a warm mug of spiced hot chocolate or a glass of cold milk—perfect for dipping! For a Halloween party, arrange them around a bubbling cauldron punch or accompany with fresh fruit slices for color contrast and a dash of brightness to balance the richness of the cookies.
Creative Ways to Present
Turn your serving tray into a mini haunted graveyard by placing your cookies upright in crumbled chocolate cookie “dirt.” Add little tombstones made from rectangular chocolate bars with names written in white icing. This thematic take will delight guests, making every bite an experience rather than just a snack.
Make Ahead and Storage
Storing Leftovers
If you’re lucky enough to have leftovers, store the Witch Finger Cookies in an airtight container at room temperature for up to a week. Keeping the cookies sealed preserves their tender texture while preventing any gnarly drying out. Just be sure the red almond nails are fully dry before storing to avoid any sticky mishaps.
Freezing
You can freeze these fingers before or after baking. If freezing raw dough, shape the fingers and press the almonds on before freezing on a tray. Transfer to an airtight container once frozen, and bake from frozen, adding a few extra minutes. For baked cookies, freeze in a sealed container with parchment paper between layers, and thaw at room temperature before serving for perfectly preserved spookiness.
Reheating
To revive crispness and warm these delightfully eerie treats, pop the cookies in a preheated 300-degree Fahrenheit oven for 3 to 5 minutes. Keep an eye on them — you want them warm but not browned. Avoid microwaving as it can make the cookies soft and lose their signature crumbly texture.
FAQs
Can I use regular food coloring instead of gel for the almond nails?
Gel food coloring is recommended because it’s more concentrated and less watery, which helps it dry faster and results in a more vibrant, long-lasting color. Using regular liquid food coloring might make the almonds too wet and could affect drying time and the final look.
What if I don’t have almond flour? Can I substitute it?
While almond flour adds a unique moistness and flavor, you can substitute it with more all-purpose flour in a pinch. However, your cookies might be slightly less tender and will miss a bit of that lovely almond complexity.
How do I shape the cookies if I don’t want to use my finger to make knuckles?
If you’re not comfortable using your finger, you can gently press the dough with the back of a spoon or a small rolling pin to create indentations. Then use a toothpick as directed to add the characteristic lines. The key is creating those subtle creases for that authentic Witch Finger look.
Can I make these cookies vegan or dairy-free?
To make these vegan, substitute the butter with a plant-based margarine and use a flax or chia egg replacement instead of a chicken egg. Keep in mind the texture might vary slightly, but with some experimentation, you can definitely enjoy a vegan-friendly Witch Finger Cookies Recipe.
How long do these cookies last once baked?
Stored properly in an airtight container, these Witch Finger Cookies stay fresh for about a week at room temperature. Beyond that, they might start to lose their tender crumb and become drier, but freezing will extend their shelf life considerably.
Final Thoughts
There’s something truly magical about this Witch Finger Cookies Recipe that brings a spark of joy and a pinch of spooky fun to any occasion. From the buttery, almond-infused dough to the delightfully eerie painted nails, this recipe is as much a fun project as it is a treat to savor. I can’t wait for you to try making these hauntingly charming cookies and watch your friends and family fall under their delicious spell.
Print
Witch Finger Cookies Recipe
- Prep Time: 20 minutes
- Cook Time: 10 minutes
- Total Time: 30 minutes
- Yield: 30 servings
- Category: Dessert
- Method: Baking
- Cuisine: American
Description
Witch Finger Cookies are spooky, fun-to-make treats perfect for Halloween parties. These buttery almond-flavored cookies are shaped like fingers, complete with knuckles and red-painted almond fingernails for a creepy yet delicious effect. They bake quickly to a tender, slightly crisp texture that pairs wonderfully with their subtle nutty and vanilla flavors.
Ingredients
Almond Fingernails
- 48 whole blanched almonds
- 2 tsp red gel food coloring
Cookie Dough
- 8 oz unsalted butter, at room temperature
- 8 oz powdered sugar (2 cups)
- 1 large egg, at room temperature
- 1 tbsp vanilla extract
- 2 tsp almond extract
- 15 oz all-purpose flour (3.5 cups)
- 2.5 oz almond flour (¾ cup)
- 1 tsp salt
Instructions
- Paint the Almonds: Use a small food-safe paintbrush to apply red gel food coloring to the top of each whole blanched almond. This will serve as the ‘fingernail’ for the witch finger cookies.
- Dry the Almonds: Let the painted almonds dry completely on a paper towel. This step can be done a few days in advance to save time on the baking day.
- Preheat Oven: Set your oven to 350°F (175°C) and line several baking sheets with parchment paper to prevent sticking and for easy cleanup.
- Mix Dry Ingredients: In a medium bowl, whisk together the all-purpose flour, almond flour, and salt until well combined. Set aside to incorporate flavors and ensure even texture.
- Cream Butter and Sugar: In a large mixing bowl, use a hand or stand mixer to cream the unsalted butter and powdered sugar together until the mixture is light and fluffy, which helps create a tender cookie.
- Add Wet Ingredients: Add the egg, vanilla extract, and almond extract to the creamed butter mixture. Mix thoroughly until all ingredients are well combined and the batter is smooth.
- Combine Wet and Dry Ingredients: Gradually add the dry ingredient mixture to the wet mixture, mixing until a uniform dough forms without any streaks of flour.
- Shape the Cookies: Roll walnut-sized portions of dough into long, thin snake shapes to resemble fingers. Place them on the prepared baking sheets. Press your finger gently down the middle of each to create knuckles, and use a toothpick to draw lines above and below the knuckles for added detail.
- Add the Fingernails: Press one red-painted almond onto the tip of each shaped cookie to resemble a fingernail, securing it gently into the dough.
- Bake: Bake the cookies for about 10 minutes, or until the edges are firm but the centers remain pale. Avoid overbaking to keep the cookies tender. Let the cookies cool completely on the baking sheets to firm up before handling.
Notes
- Allow painted almonds to dry thoroughly to avoid smudging during cookie assembly.
- You can paint the almonds several days in advance to save preparation time.
- Handle the shaped dough gently to maintain the finger details and prevent cracking.
- Store cookies in an airtight container at room temperature for up to one week.
- For an extra spooky effect, you can add a tiny bit of gel food coloring on the knuckles to simulate bruises.


