
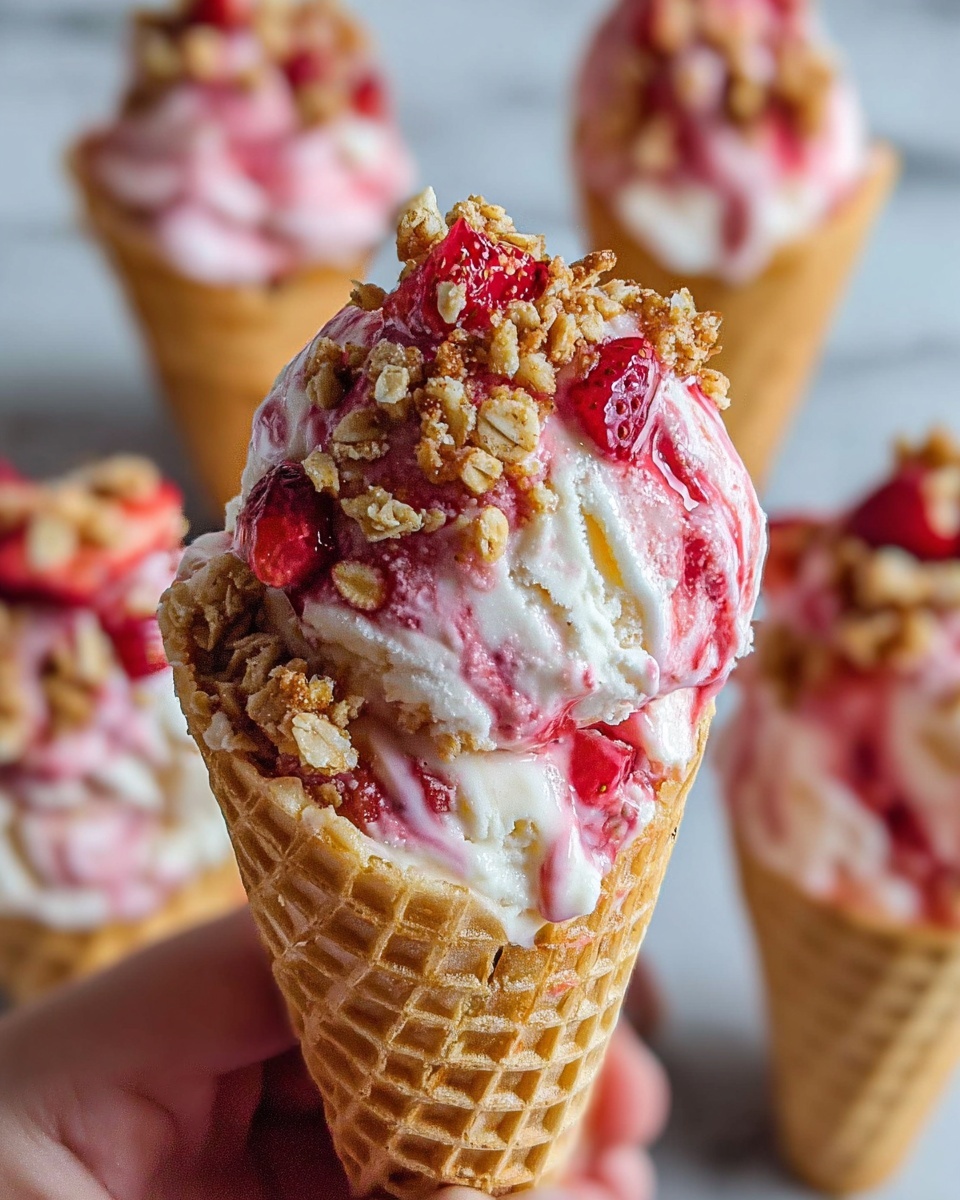
If you’re on the lookout for a dessert that’s as delightful to eat as it is to make, the Strawberry Crunch Cheesecake Cones Recipe is an absolute must-try. Picture creamy, fluffy cheesecake filling swirled with fresh, juicy strawberries, nestled inside a crunchy waffle cone, and sprinkled with a crisp, textured topping. This recipe brings together the best of creamy, fruity, and crunchy in a handheld treat that’s perfect for warm days, parties, or whenever you want a dessert that steals the show. It’s approachable, scrumptious, and sure to bring smiles around the table.
Ingredients You’ll Need
The magic behind these cheesecake cones lies in simple, fresh ingredients that each play a starring role. From the rich cream cheese that forms a velvety base, to the fresh strawberries that add a burst of natural sweetness and color, every component is chosen to balance taste and texture perfectly.
- Cream cheese, 8 oz, softened: This provides the creamy and tangy base essential for that classic cheesecake flavor and smooth texture.
- Powdered sugar, 1/2 cup: Adds gentle sweetness without grittiness, helping the filling stay luscious.
- Vanilla extract, 1 teaspoon: A small touch brings warmth and depth to the flavor profile.
- Heavy cream, 1 cup: Whipped to stiff peaks, this lightens the cheesecake filling for a fluffy, melt-in-your-mouth consistency.
- Fresh strawberries, 1 cup sliced: They provide juiciness, vibrant color, and natural sweetness that brighten each bite.
- Crunchy toppings, 1/2 cup (crushed graham crackers, nuts, or cereal): These add a wonderful contrast in texture that makes the dessert truly unforgettable.
- Waffle cones, 6–8 sturdy cones: These serve as the perfect edible vessel, crispy enough to hold the filling without sogginess.
How to Make Strawberry Crunch Cheesecake Cones Recipe
Step 1: Prepare the Cheesecake Filling
Start by beating your softened cream cheese in a large bowl until it’s smooth and creamy. This is the base of your filling, so make sure there are no lumps. Gradually add the powdered sugar and vanilla extract, mixing continuously until everything is beautifully blended into a silky batter. This simple step lays the foundation for the luscious texture you crave.
Step 2: Whip the Heavy Cream
Now it’s time to whip the heavy cream. Use a chilled bowl and electric mixer to beat the cream until it forms stiff peaks. This means when you lift the beaters, the cream stands tall and firm. Whipping the cream to this stage is key for that light, airy lift in the filling that transforms ordinary cheesecake into something cloud-like and dreamy.
Step 3: Fold Whipped Cream Into Cheesecake Mixture
Gently fold the whipped cream into your cream cheese batter using a spatula. The goal here is to combine them without deflating the fluffy whipped cream, preserving the airy texture. Take your time and use a gentle folding motion to keep everything light and smooth.
Step 4: Add Crunchy Toppings
Mix in your choice of crunchy toppings — whether crushed graham crackers, chopped nuts, or crunchy cereal — into the cheesecake mixture. These little bites add a delightful textural contrast, making each mouthful exciting and just a touch unexpected. This step is what sets this recipe apart and gives the Strawberry Crunch Cheesecake Cones their signature crunch.
Step 5: Assemble the Cones
Finally, it’s time to fill your waffle cones. You can use a spoon or a piping bag to neatly fill each cone with the cheesecake filling. Don’t be shy—fill them generously! Top with sliced fresh strawberries and sprinkle a little extra crunchy topping on each cone for that final pop of color and texture. They’re now ready to impress.
How to Serve Strawberry Crunch Cheesecake Cones Recipe

Garnishes
Fresh strawberries on top are gorgeous, but you can also add a few mint leaves for a fresh note or a dusting of powdered sugar for that elegant touch. A drizzle of chocolate or strawberry sauce can also make these cones look and taste like a dessert from an upscale café.
Side Dishes
While these cones stand beautifully on their own, pairing them with a scoop of vanilla bean ice cream or a fresh fruit salad can elevate your dessert spread. Light and fresh options complement the richness without overpowering the delicate cheesecake flavor.
Creative Ways to Present
Serve your cheesecake cones in a decorative cone holder or stand to keep them upright and neat. You can also wrap the bottoms in colorful parchment for easy handling at parties. For a fun twist, try layering different flavors into the cones before topping them for a surprise in every bite.
Make Ahead and Storage
Storing Leftovers
If you have any cones left over, cover them loosely with plastic wrap and refrigerate immediately. Because of the waffle cone’s nature, they’re best eaten within a day or two to keep the crispness intact and prevent sogginess.
Freezing
You can freeze the cheesecake filling separately in an airtight container for up to a month. When ready to enjoy, thaw it overnight in the fridge and refill fresh waffle cones. Avoid freezing the cones themselves, as they typically get soggy when thawed.
Reheating
These cones are best served chilled; reheating is not recommended because it can soften the cones and change the texture of the cheesecake filling. Simply serve straight from the fridge for the best experience.
FAQs
Can I use frozen strawberries for this recipe?
While fresh strawberries provide the best texture and flavor, you can use defrosted frozen strawberries if needed. Just make sure to drain any excess liquid before adding them to prevent the filling from becoming watery.
What can I substitute for heavy cream?
Heavy cream is ideal for whipping to stiff peaks, but if you need a substitute, you can try chilled coconut cream for a dairy-free version. Keep in mind that texture and flavor will vary slightly.
How long do strawberry crunch cheesecake cones stay fresh?
They’re best enjoyed on the day they’re made, but if refrigerated, they can keep well for up to 2 days. Beyond that, the cones may start losing their crunch.
Can I make this recipe vegan?
With some ingredient swaps like vegan cream cheese, coconut cream, and plant-based waffle cones, you can make a vegan version. The texture might be a bit different, but still delicious!
What types of crunchy toppings work best?
Crushed graham crackers, toasted nuts, or even crispy cereal like cornflakes all work wonderfully. Choose according to your taste preference and dietary needs, or mix a few for extra texture complexity.
Final Thoughts
There’s something truly joyful about the Strawberry Crunch Cheesecake Cones Recipe—it’s simple to make, fun to serve, and absolutely irresistible to eat. Whether you’re treating yourself or sharing with friends, this recipe brings a perfect balance of creamy, crunchy, and fresh flavors that feels both playful and indulgent. I can’t wait for you to whip up a batch and fall in love with this delightful dessert just like I have!
Print
Strawberry Crunch Cheesecake Cones Recipe
- Prep Time: 15 minutes
- Cook Time: 0 minutes
- Total Time: 15 minutes
- Yield: 6-8 servings
- Category: Dessert
- Method: No-Cook
- Cuisine: American
- Diet: Vegetarian
Description
Strawberry Crunch Cheesecake Cones are a delightful no-bake dessert combining creamy cheesecake filling with fresh strawberries and crunchy toppings, all served in crispy waffle cones. Perfect for a quick, fun, and mess-free treat, these cones blend smooth cream cheese, whipped heavy cream, sweet powdered sugar, and vanilla with fresh fruit and texture-rich crumbs for a refreshing and indulgent snack.
Ingredients
Cheesecake Filling
- 8 oz cream cheese, softened
- 1/2 cup powdered sugar
- 1 teaspoon vanilla extract
- 1 cup heavy cream
Fruit and Crunch
- 1 cup fresh strawberries, sliced
- 1/2 cup crunchy toppings (crushed graham crackers, nuts, or cereal)
Assembly
- 6–8 waffle cones, crispy and sturdy
Instructions
- Prepare the Cheesecake Filling: In a large bowl, beat the softened cream cheese with an electric mixer until smooth and creamy. Gradually add powdered sugar and vanilla extract while mixing continuously until the batter becomes silky and evenly combined.
- Whip the Heavy Cream: In a separate chilled bowl, whip the heavy cream until stiff peaks form, creating a light and fluffy texture that will give your cheesecake filling volume and airiness.
- Fold Whipped Cream Into Cheesecake Mixture: Carefully fold the whipped cream into the cream cheese mixture using a spatula. Take care not to deflate the mixture, ensuring the filling remains airy yet creamy and smooth.
- Add Crunchy Toppings: Gently incorporate the crushed graham crackers or your chosen crunchy toppings into the cheesecake filling to add a delightful texture contrast in every bite.
- Assemble the Cones: Use a spoon or piping bag to fill each crispy waffle cone with the cheesecake mixture. Top each cone with sliced fresh strawberries and sprinkle some extra crunchy toppings over the top to finish the presentation.
Notes
- For best results, chill your mixing bowl and beaters before whipping the heavy cream to help it reach stiff peaks faster.
- You can substitute crunchy toppings with crushed nuts, cereals, or cookie crumbs depending on your preference.
- Keep the assembled cones refrigerated until serving to maintain filling firmness and freshness.
- Use sturdy waffle cones to avoid breaking or sogginess from the moist filling.
- These cones are best consumed within 24 hours for optimal texture and flavor.


