
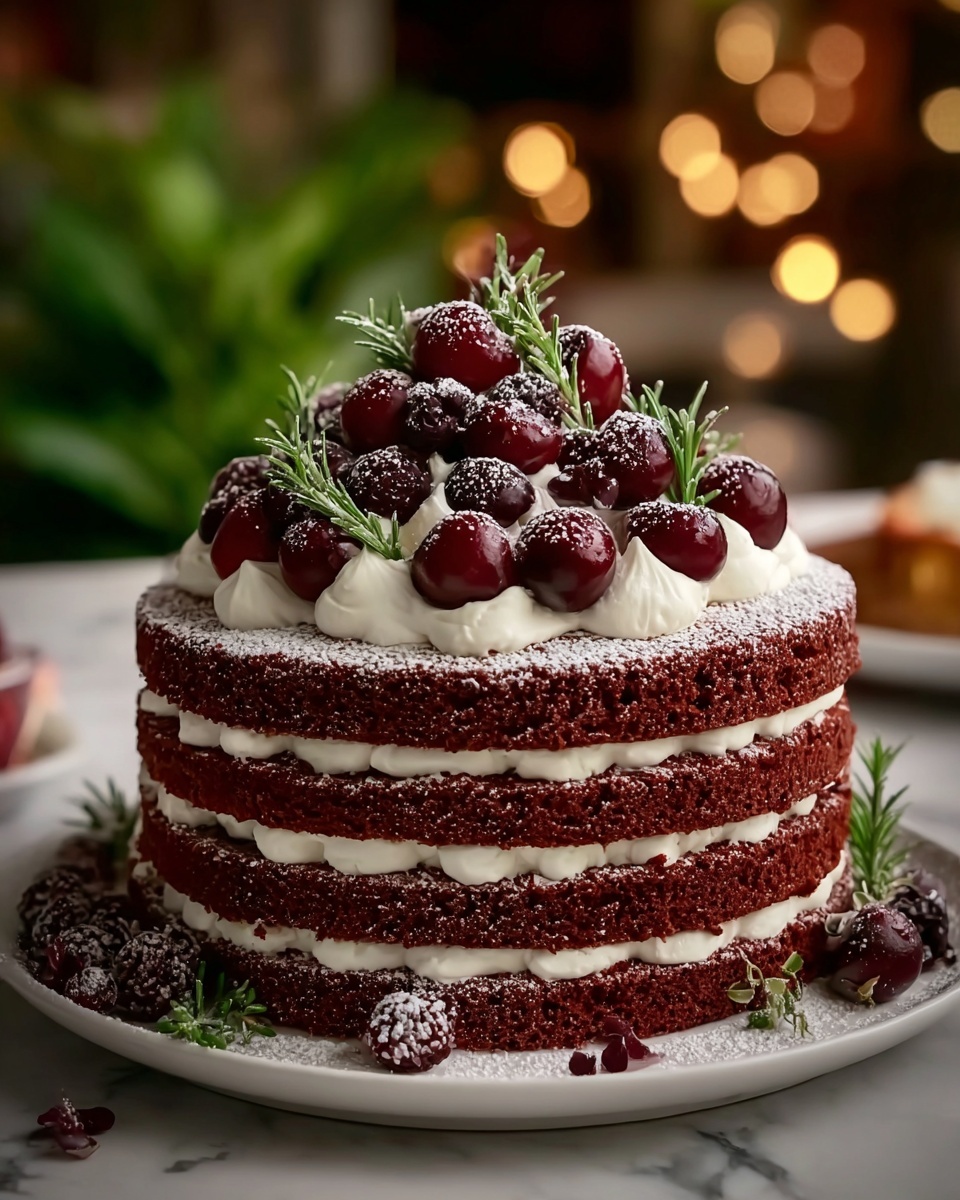
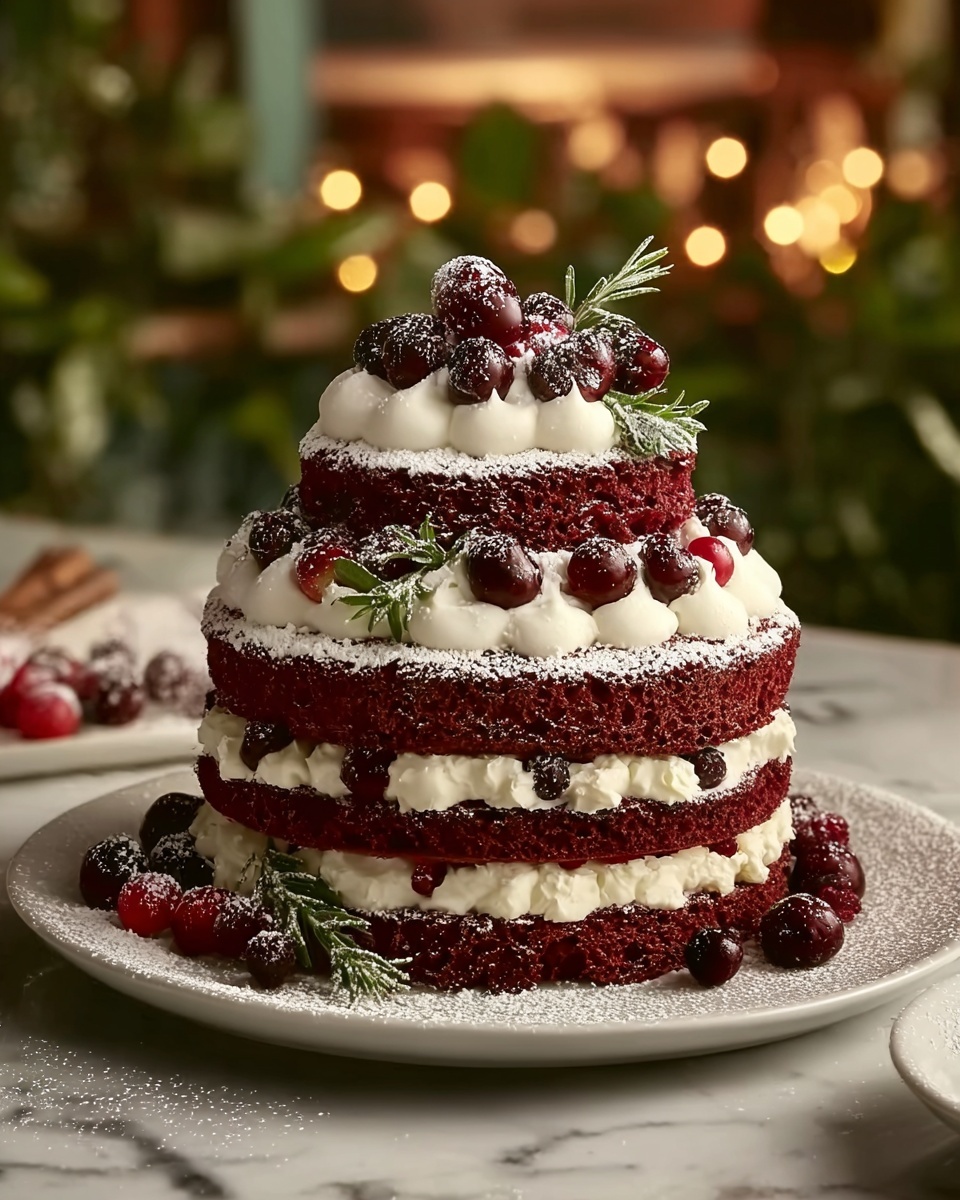
If you’re searching for a show-stopping dessert that combines festive charm with indulgent flavor, this Red Velvet Tree Cake Recipe is an absolute must-try. It’s a delightful twist on the classic red velvet cake, shaped and decorated like a beautiful Christmas tree, making it perfect for holiday gatherings or any special occasion where you want to impress your guests. With its tender crumb, rich cream cheese frosting, and charming decorations, this cake not only looks stunning but tastes irresistibly delicious. I’m excited to walk you through every step to create this festive masterpiece in your own kitchen!
Ingredients You’ll Need
Simple but essential, each ingredient in this recipe plays a vital role in crafting the perfect balance of flavor, texture, and color that defines the Red Velvet Tree Cake Recipe. From the subtle cocoa powder that gives depth to the red velvet, to the tangy buttermilk that ensures moistness, these ingredients come together beautifully.
- All-purpose flour: The base of the cake, providing structure and tenderness.
- Baking powder: Helps the cake rise giving it a light, fluffy texture.
- Baking soda: Works with vinegar and buttermilk to create a perfect crumb.
- Salt: Enhances flavor and balances the sweetness.
- Cocoa powder: Adds a subtle chocolate note vital to red velvet’s signature taste.
- Vegetable oil: Keeps the cake moist and soft.
- Granulated sugar: Sweetens while contributing to a tender crumb.
- Eggs: Bind ingredients and provide structure with richness.
- Vanilla extract: Adds warm, sweet aroma and enhances overall flavor.
- Buttermilk: Keeps cake tender and adds a slight tang that balances the sweetness.
- Red food coloring: Crucial for that iconic bright red hue.
- White vinegar: Reacts with baking soda to help the cake rise and maintain color.
- Cream cheese: The heart of the frosting, offering creamy tanginess.
- Unsalted butter: Adds richness and smoothness to the frosting.
- Powdered sugar: Sweetens and thickens the frosting for easy spreading.
- Green sprinkles or edible glitter: Perfect for decorating your cake to resemble a festive tree.
- Piping gel or melted white chocolate (optional): Adds a magical snowy effect for extra charm.
How to Make Red Velvet Tree Cake Recipe
Step 1: Prepare Your Oven and Pans
Start by preheating your oven to 350°F (175°C). It’s essential to properly grease and flour your tree-shaped cake pan so the cake comes out easily and retains the perfect shape. If you don’t have a tree mold, feel free to use round cake pans and assemble them creatively later.
Step 2: Combine Your Dry Ingredients
In a medium bowl, whisk together the flour, baking powder, baking soda, salt, and cocoa powder. This careful mixing ensures even distribution of leavening agents and cocoa, giving the cake an even crumb and balanced chocolate undertone.
Step 3: Mix Wet Ingredients Except Buttermilk
In a large bowl, beat together the vegetable oil and sugar until light and fluffy—this step introduces air for a tender texture. Then, add eggs one at a time, mixing well after each to fully incorporate. Stir in the vanilla extract to infuse the batter with warm, aromatic flavor.
Step 4: Combine Buttermilk, Food Coloring, and Vinegar
In a separate bowl, mix the buttermilk with red food coloring and white vinegar. The vinegar activates the baking soda and helps maintain the vibrant red color, while the buttermilk ensures the cake stays moist and tangy.
Step 5: Alternate Adding Dry and Wet Mixtures
Gradually add the dry ingredient mixture to the wet ingredients, alternating with the buttermilk mixture. Start and finish with the dry ingredients for optimum texture. Mix just until everything is combined—overmixing can make the cake tough.
Step 6: Bake Your Cake
Pour the batter into your prepared pan and bake for 30-35 minutes. The cake is done when a toothpick inserted in the center comes out clean. Remove from the oven and allow it to cool in the pan for 10 minutes before turning it out onto a wire rack to cool completely.
Step 7: Prepare the Cream Cheese Frosting
While the cake cools, beat together softened cream cheese and unsalted butter until smooth and creamy. Gradually add powdered sugar, beating well after each addition to create a luscious, spreadable frosting. Mix in vanilla extract and a pinch of salt to enhance flavor.
Step 8: Frost and Decorate Your Cake
Once your cake has fully cooled, generously spread the cream cheese frosting all over. Finish by decorating with green sprinkles or edible glitter to mimic pine needles and add piping gel or melted white chocolate for a frosty snow effect. Your Red Velvet Tree Cake Recipe is now ready for guests to admire and enjoy!
How to Serve Red Velvet Tree Cake Recipe
Garnishes
Decorate your Red Velvet Tree Cake Recipe with festive green sprinkles or edible glitter to bring out holiday cheer. The optional snowy effect with piping gel or melted white chocolate adds a whimsical touch that makes each slice look magical.
Side Dishes
Pair this rich, creamy cake with a light, refreshing berry compote or a crisp glass of milk to balance sweetness. If you want to elevate it further, serve alongside a dollop of whipped cream or a scoop of vanilla bean ice cream for a classic duo.
Creative Ways to Present
Consider placing your cake on a rustic wooden board or a plate dusted with powdered sugar “snow.” Add edible gold stars or place mini ornaments around the base for a festive centerpiece effect. For gatherings, slice into tree-shaped wedges that delight both kids and adults alike.
Make Ahead and Storage
Storing Leftovers
Keep any leftover Red Velvet Tree Cake Recipe tightly covered in the refrigerator. Wrapped well, the cake will stay moist and the frosting fresh for up to 4 days—perfect for enjoying a sweet treat the next day.
Freezing
You can freeze the unfrosted cake layers wrapped securely in plastic wrap and then foil for up to 3 months. When you’re ready to enjoy, thaw in the fridge overnight before frosting and decorating to maintain the cake’s tender texture and flavor.
Reheating
Since this cake is best enjoyed chilled or at room temperature, avoid reheating. If you prefer a warmer slice, allow the cake to come to room temperature out of the fridge for about 20 minutes before serving. This softens the frosting and enhances flavor without compromising texture.
FAQs
Can I use regular milk instead of buttermilk?
Yes, you can substitute regular milk mixed with a tablespoon of lemon juice or vinegar to mimic buttermilk’s acidity, which helps tenderize the cake and activate baking soda.
What if I don’t have a tree-shaped cake pan?
No worries! Use round or square pans and either stack layers to form a tree shape or simply frost and decorate in a festive pattern that suits your occasion.
Is it possible to make this recipe vegan?
To make a vegan Red Velvet Tree Cake Recipe, substitute eggs with flax eggs or applesauce, use plant-based milk mixed with vinegar for buttermilk, and vegan cream cheese and butter alternatives for frosting.
How do I achieve the vibrant red color?
The key to that classic red velvet color is using good-quality red food coloring and combining it with cocoa powder and vinegar to activate and deepen the hue naturally.
Can I prepare the frosting in advance?
Absolutely! Cream cheese frosting keeps well refrigerated for a few days. Just bring it back to room temperature and give it a quick whip before spreading on your cake for perfect smoothness.
Final Thoughts
This Red Velvet Tree Cake Recipe is such a joyful celebration on a plate—a perfect blend of flavors, texture, and festive presentation that’s sure to become a holiday favorite. Baking and sharing this cake is a wonderful way to create warm memories and impress your loved ones. So don’t hesitate—grab your ingredients, dust off your cake pans, and bring this charming treat to life!
Print
Red Velvet Tree Cake Recipe
- Prep Time: 20 minutes
- Cook Time: 35 minutes
- Total Time: 55 minutes
- Yield: 10 servings
- Category: Dessert
- Method: Baking
- Cuisine: American
- Diet: Vegetarian
Description
This Red Velvet Tree Cake is a festive and visually striking dessert perfect for holiday celebrations. Moist and tender red velvet layers are baked in a tree-shaped pan and frosted with a smooth, tangy cream cheese frosting. Adorned with green sprinkles, edible glitter, and optional snow-like piping gel or white chocolate, this cake not only tastes delightful but also doubles as a charming centerpiece.
Ingredients
For the Cake:
- 2 ½ cups all-purpose flour
- 1 ½ teaspoons baking powder
- 1 teaspoon baking soda
- 1 teaspoon salt
- 2 tablespoons cocoa powder
- 1 cup vegetable oil
- 1 ½ cups granulated sugar
- 2 large eggs
- 1 teaspoon vanilla extract
- 1 cup buttermilk
- 2 tablespoons red food coloring
- 1 teaspoon white vinegar
For the Cream Cheese Frosting:
- 8 oz cream cheese, softened
- ½ cup unsalted butter, softened
- 4 cups powdered sugar
- 1 teaspoon vanilla extract
- Pinch of salt
For Decoration:
- Green sprinkles or edible glitter (for tree decoration)
- Piping gel or melted white chocolate (for “snow” effect, optional)
Instructions
- Preheat and Prepare Pan: Preheat your oven to 350°F (175°C). Grease and flour a tree-shaped cake pan or regular round pans if you do not have a tree mold, ensuring the cake releases easily after baking.
- Mix Dry Ingredients: In a medium bowl, whisk together all-purpose flour, baking powder, baking soda, salt, and cocoa powder until evenly combined, which forms the dry base of your batter.
- Cream Wet Ingredients: In a large bowl, beat vegetable oil and granulated sugar together until the mixture is light and fluffy. Add eggs one at a time, beating thoroughly after each addition. Stir in the vanilla extract for flavor.
- Combine Buttermilk Mixture: In a separate bowl, mix buttermilk with red food coloring and white vinegar to activate the leavening and color of the cake.
- Incorporate Dry and Wet Mixtures: Gradually add the dry ingredients alternately with the buttermilk mixture to the wet ingredients, starting and ending with the dry. Mix gently until just combined to maintain a tender crumb.
- Bake the Cake: Pour the batter into the prepared pan(s) and bake for 30 to 35 minutes. Test doneness by inserting a toothpick into the center; it should come out clean.
- Cool the Cake: Allow the cake to cool in the pan for 10 minutes, then transfer it to a wire rack to cool completely, ensuring the frosting does not melt upon application.
- Prepare the Frosting: Beat cream cheese and softened butter until creamy and smooth. Gradually add powdered sugar, one cup at a time, beating well between additions. Stir in vanilla extract and a pinch of salt to balance sweetness.
- Frost the Cake: Once the cake is fully cooled, evenly spread the cream cheese frosting over the layers or the entire cake as desired for a rich finish.
- Decorate the Cake: Adorn the frosted cake with green sprinkles or edible glitter to mimic tree decorations. Optionally, drizzle with piping gel or melted white chocolate to create a snow effect for a festive look.
- Serve and Enjoy: Slice your beautifully decorated Red Velvet Tree Cake and enjoy the moist texture and tangy frosting with family and friends.
Notes
- Make sure the cake is completely cooled before frosting to prevent the cream cheese frosting from melting.
- If you don’t have buttermilk, substitute with 1 cup milk mixed with 1 tablespoon lemon juice or vinegar; let it sit for 5 minutes.
- Use gel food coloring for a more vibrant red without altering the batter consistency.
- For easier slicing, chill the cake slightly before cutting.
- Store leftover cake in the refrigerator due to the cream cheese frosting.

