
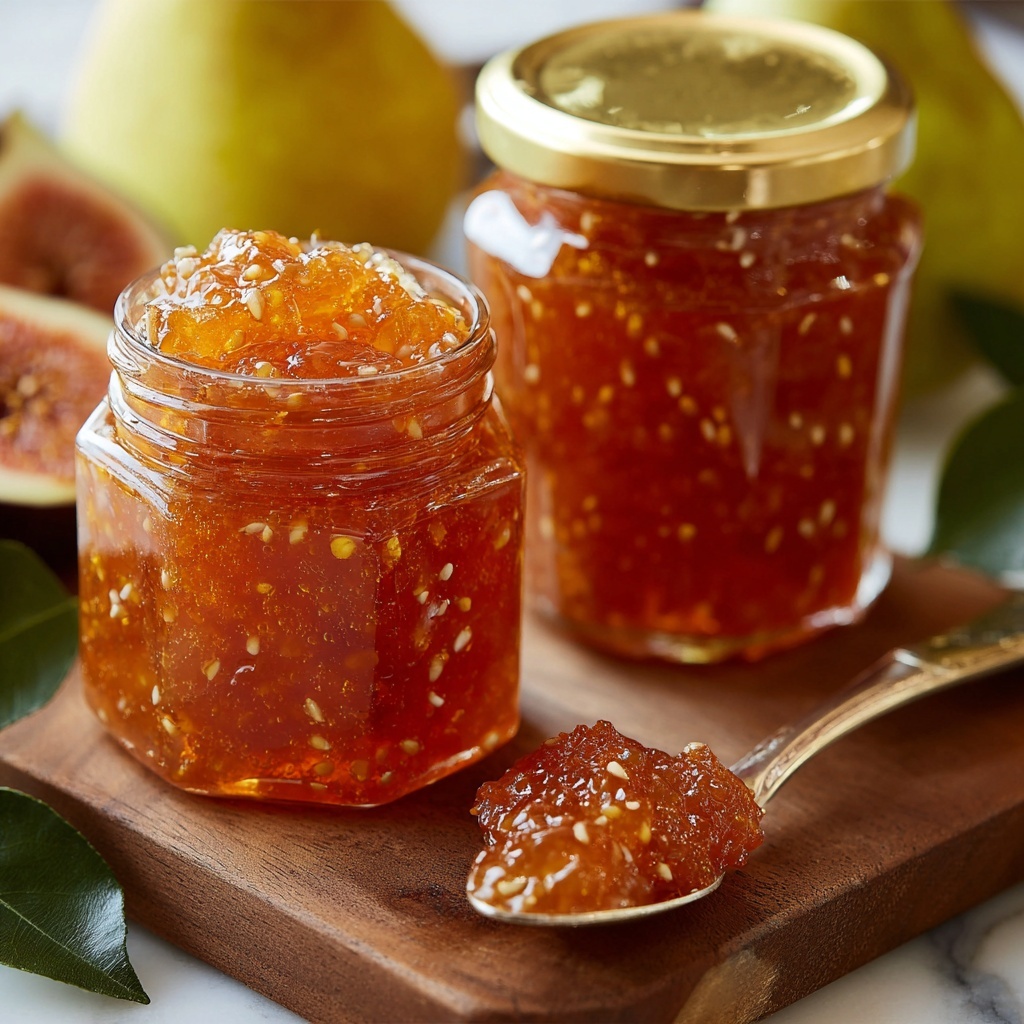
There is something wonderfully comforting about a homemade fruit spread, and this Pear Preserves Recipe: Easy Homemade Sweet Spread Recipe is truly a gem to have in your kitchen. Sweet, slightly spiced, and bursting with fresh pear flavor, this preserve captures the essence of ripe pears in every luscious spoonful. Whether slathered on toast or dolloped onto yogurt, it’s an absolutely delightful way to add a touch of natural sweetness to your meals. Best of all, it’s incredibly straightforward to make from scratch, letting you enjoy the freshest taste without any fuss.

Ingredients You’ll Need
These simple, essential ingredients come together to create a beautifully balanced pear preserve. Each one plays a vital role, from providing sweetness and acidity to enhancing the natural pear flavor and texture.
- Ripe pears (4 cups, peeled, cored, and finely chopped): Fresh pears are the heart of this recipe, bringing natural sweetness and mellow flavor.
- Granulated sugar (3 cups): Balances the tartness of the pears and helps achieve that perfect preserve consistency.
- Fresh lemon juice (2 tablespoons): Adds bright acidity that elevates the flavor and helps with preservation.
- Ground cinnamon (1/2 teaspoon, optional): Offers warm spice notes that complement the pear’s sweetness beautifully.
- Ground nutmeg (1/4 teaspoon, optional): Adds a subtle hint of aromatic depth for an inviting finish.
How to Make Pear Preserves Recipe: Easy Homemade Sweet Spread Recipe
Step 1: Prepare the Pears
Start by washing, peeling, coring, and finely chopping your ripe pears. Taking the extra time here ensures your preserves have a lovely texture with tender, juicy fruit pieces throughout.
Step 2: Combine Ingredients in a Pot
Place the chopped pears, granulated sugar, and fresh lemon juice into a large saucepan over medium heat. Stir everything together thoroughly to combine the ingredients evenly, setting the stage for that perfect sweetness and tang.
Step 3: Cook Until Juices Release
As the mixture heats, stir frequently to help the sugar dissolve and encourage the pears to release their natural juices. This step is key for building that syrupy, luscious base that your preserves will develop from.
Step 4: Simmer and Thicken
Bring the mixture to a gentle boil, then reduce the heat to maintain a simmer. Continue cooking for about 25 to 30 minutes, stirring occasionally to prevent sticking and burning. During this time, mash some of the pears lightly with your spoon to create a chunky yet spreadable consistency.
Step 5: Add Spices and Final Touches
If you’re using cinnamon and nutmeg, stir them in during the last few minutes of cooking. These warm spices add a lovely cozy flavor that transforms this Pear Preserves Recipe: Easy Homemade Sweet Spread Recipe into a fall favorite.
Step 6: Cool and Store
Once your preserve has thickened to a velvety texture, remove it from heat and let it cool slightly. Transfer the mixture into clean jars, leaving enough room at the top for expansion. Allow the jars to cool completely before sealing and placing them in the refrigerator.
How to Serve Pear Preserves Recipe: Easy Homemade Sweet Spread Recipe
Garnishes
A small sprinkle of chopped toasted nuts or a few fresh herbs, like a tiny leaf of mint or thyme, can turn your pear preserve into a stunning garnish. These little touches add texture and visual appeal, especially when serving on cheese boards or desserts.
Side Dishes
Pear preserves complement a wide variety of dishes beautifully. Try pairing it with crusty bread or warm biscuits for breakfast, or use it as a sweet accent alongside rich cheeses and charcuterie for a sophisticated snack or appetizer.
Creative Ways to Present
Why not get playful? Swirl your homemade pear preserves into Greek yogurt or oatmeal for a naturally sweet boost. You can also use it as a filling for pastries or spread it between layers of a simple cake to add moistness and depth of flavor.
Make Ahead and Storage
Storing Leftovers
Your homemade pear preserves keep wonderfully in the refrigerator for up to three weeks once sealed properly. Be sure to use a clean spoon to avoid contamination, and enjoy little spoonfuls whenever a sweet craving hits.
Freezing
If you want to save your preserves for longer, freezing is a great option. Use freezer-safe containers, leaving some space for expansion, and thaw in the fridge when ready to use. Although the texture might soften slightly, the delightful flavor remains intact.
Reheating
To enjoy your preserves warm, gently reheat them in a small saucepan over low heat, stirring slowly. Warm preserves make a fantastic topping for pancakes or ice cream and bring out the spices even more.
FAQs
Can I use other types of pears for this recipe?
Absolutely! While firmer pears like Bosc or Anjou work best to maintain texture, you can experiment with Bartlett or other varieties, just be mindful that softer pears will yield a less chunky preserve.
Is it necessary to add lemon juice?
Yes, lemon juice not only balances the sweetness but also helps preserve the color and acts as a natural preservative to extend shelf life.
Can I skip the cinnamon and nutmeg?
Of course! These spices are optional but highly recommended for adding warmth and complexity to the flavor. If you prefer a pure pear taste, feel free to leave them out.
How long will the preserves last once opened?
Stored properly in the refrigerator, the pear preserves should stay fresh for about three weeks. Always check for any signs of spoilage like off smells or mold before consuming.
Can I can these preserves for longer storage?
Yes, if you are familiar with home canning techniques, you can process the preserves in sterilized jars for extended shelf life. Just ensure you follow safe canning protocols to avoid any risks.
Final Thoughts
This Pear Preserves Recipe: Easy Homemade Sweet Spread Recipe is one of those treasures that brings warmth and genuine joy to your kitchen and table. Its inviting flavors and simple method make it a perfect project for any home cook eager to enjoy the pure, natural taste of pears whenever you like. Give it a try—you’ll find it quickly becomes a sweet staple you’ll reach for again and again.
Print
Pear Preserves Recipe: Easy Homemade Sweet Spread Recipe
- Prep Time: 15 minutes
- Cook Time: 30 minutes
- Total Time: 45 minutes
- Yield: 3 cups
- Category: Condiment
- Method: Stovetop
- Cuisine: American
- Diet: Vegan
Description
This easy homemade Pear Preserves recipe yields a sweet and flavorful spread crafted from ripe pears, sugar, and a hint of lemon juice, with optional warming spices like cinnamon and nutmeg. Perfect for spreading on toast, pancakes, or yogurt, these preserves are thick, chunky, and naturally delicious without any artificial additives.
Ingredients
Fruit
- 4 cups ripe pears, peeled, cored, and finely chopped
Sweeteners & Flavorings
- 3 cups granulated sugar
- 2 tablespoons fresh lemon juice
Optional Spices
- 1/2 teaspoon ground cinnamon
- 1/4 teaspoon ground nutmeg
Instructions
- Prepare the Pears: Wash, peel, core, and finely chop the pears into small pieces to ensure even cooking and a smooth preserve texture.
- Combine Ingredients: Place the chopped pears in a large saucepan or pot over medium heat. Add the granulated sugar and fresh lemon juice, stirring well to combine all ingredients thoroughly.
- Cook the Mixture: Cook over medium heat, stirring frequently until the sugar dissolves and the pears release their natural juices, bringing the mixture to a gentle boil.
- Simmer and Thicken: Continue to cook the mixture at a gentle boil for 25 to 30 minutes, stirring occasionally to prevent sticking. As the preserve thickens, lightly mash some pear pieces with a spoon for a chunky texture.
- Add Spices: If using, stir in the ground cinnamon and nutmeg during the last few minutes of cooking to infuse the preserves with warm spice notes.
- Finish and Cool: Continue simmering until the preserves reach a thick, spreadable consistency. Remove from heat and allow to cool slightly before transferring to clean jars. Let cool completely before sealing and storing in the refrigerator.
Notes
- Use ripe but firm pears for the best texture and flavor in your preserves.
- The preserves will continue to thicken as they cool, so aim for a slightly thinner consistency while cooking.
- For longer storage, process the preserves in sterilized jars using proper canning techniques to ensure safety and freshness.
- This pear spread pairs wonderfully with toast, biscuits, pancakes, or yogurt for a delightful breakfast or snack.


