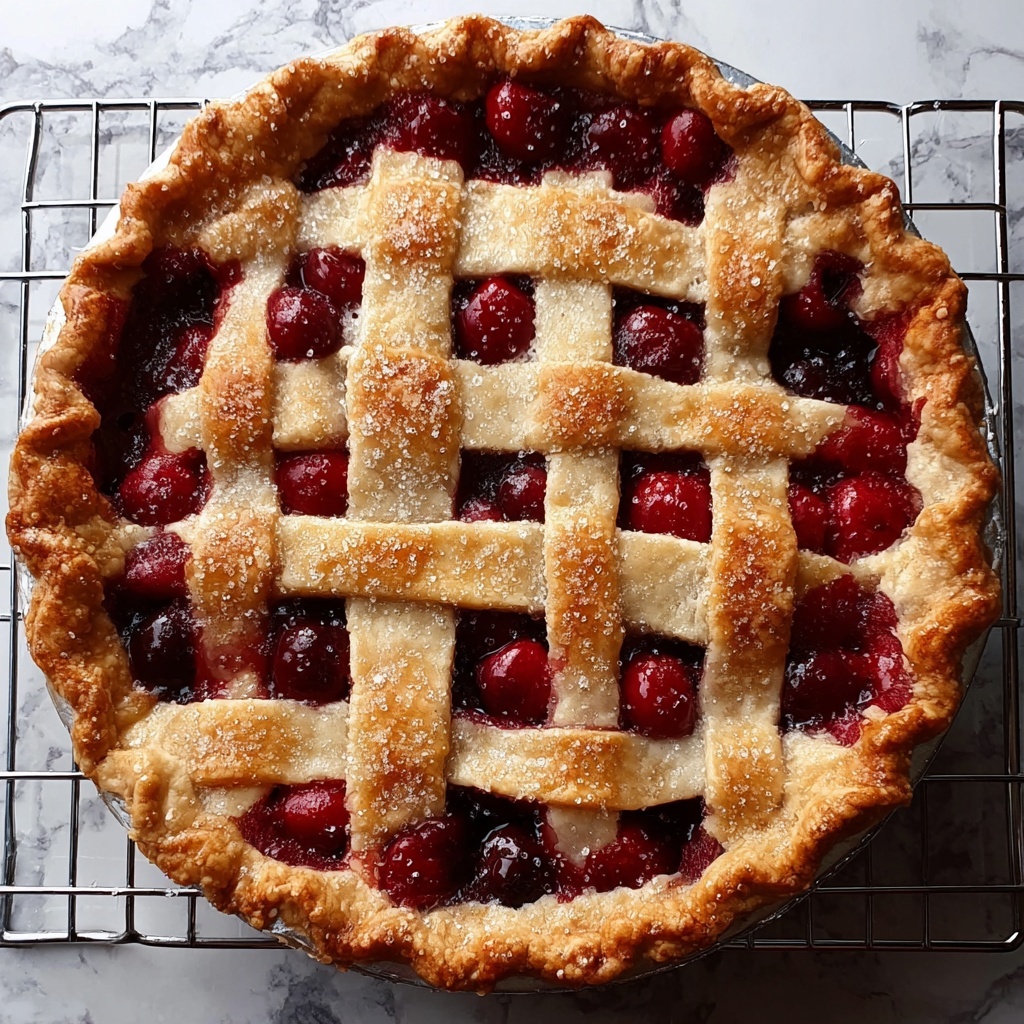
If you have a soft spot for classic American desserts, this Baked Fresh Cherry Pie Recipe will quickly become one of your all-time favorites. Imagine biting into a flaky, buttery crust that cradles a luscious filling bursting with juicy, tart cherries enhanced by the subtle warmth of almond and vanilla extracts. This pie is the perfect way to showcase the brilliance of fresh cherries, transforming simple ingredients into a dessert that feels both comforting and special. Preparing and baking this pie is a joyful experience that fills your kitchen with an irresistible aroma, inviting everyone to gather around and savor a slice of homemade bliss.
Ingredients You’ll Need
Each ingredient in this Baked Fresh Cherry Pie Recipe plays a crucial role in balancing texture, flavor, and the gorgeous color that makes this pie so inviting. Keep things simple and let the freshness of your cherries shine.
- Pastry for a 9-inch double crust pie: The foundation of your pie, offering a flaky texture that’s buttery and golden.
- Quick-cooking tapioca (4 tablespoons): A natural thickener that keeps the cherry filling from becoming too runny while maintaining its vibrant look.
- Salt (⅛ teaspoon): Enhances the depth of flavor throughout, cutting through the sweetness just enough.
- White sugar (1 cup): Sweetens the filling perfectly without overpowering the cherries’ natural tartness.
- Pitted cherries (4 cups): The star ingredient, fresh and juicy, delivering that unmistakable cherry punch.
- Almond extract (¼ teaspoon): Adds a delicate nutty flavor that complements the cherries beautifully.
- Vanilla extract (½ teaspoon): Lends warmth and roundness to the overall taste profile.
- Butter (1 ½ tablespoons): Adds richness and moistness, dotting the filling for a luscious finish.
How to Make Baked Fresh Cherry Pie Recipe
Step 1: Prepare Your Oven and Crust
Start by preheating your oven to 400 degrees Fahrenheit (205 degrees Celsius). While it’s heating, place the bottom pastry crust snugly into your pie pan and keep the top crust covered separately. Taking this step ensures your oven is hot enough to bake the crust to that perfect golden crispness from the get-go.
Step 2: Combine the Filling Ingredients
In a large mixing bowl, gently toss together the quick-cooking tapioca, salt, sugar, pitted cherries, almond extract, and vanilla extract. Letting this mixture sit for 15 minutes allows the tapioca to absorb some juices and the flavors to mingle, which is key to creating that thick, luscious filling that won’t spill over.
Step 3: Assemble Your Pie
Pour your fragrant cherry mixture into the pie crust, spreading it out evenly. Then, dot the filling generously with the butter. The butter will melt and infuse the filling with a gorgeous richness as the pie bakes.
Step 4: Seal and Vent the Pie
Place the top crust over the filling and flute the edges beautifully to secure the pie’s integrity and create an attractive finish. Carefully cut vents in the top crust to allow steam to escape while baking — a crucial step to avoid sogginess.
Step 5: Prepare for Baking
Set your pie on a foil-lined cookie sheet before placing it in the oven. This simple trick catches any drips, saving you a sticky mess in your oven later.
Step 6: Bake to Perfection
Bake for 50 minutes in the preheated oven until the crust is a perfect golden brown and the filling is bubbling enticingly. The smell alone will have you eagerly awaiting the finished product!
Step 7: Cool and Set
Once baked, allow your cherry pie to cool for several hours. This resting period lets the filling set firmly, so when you cut into it, you get neat, luscious slices instead of a flowing river of cherry juice.
How to Serve Baked Fresh Cherry Pie Recipe
Garnishes
Simple garnishes like a dollop of freshly whipped cream, a scoop of vanilla ice cream, or even a light dusting of powdered sugar can elevate your cherry pie to a wonderful dessert experience. The creaminess of whipped cream or ice cream pairs wonderfully with the tart, sweet cherries and buttery crust.
Side Dishes
For a complete dessert plate, pair your Baked Fresh Cherry Pie Recipe with a refreshing fruit salad or a crisp apple slaw. These sides add a contrast of textures and flavors, balancing the sweetness of the pie with a fresh, light bite.
Creative Ways to Present
Try serving your pie in individual ramekins for charming personal pies, or drizzle the slices with a warm caramel sauce for a decadent touch. For gatherings, a rustic wooden board surrounded by seasonal fruits can create a beautiful presentation that’s as inviting as the pie itself.
Make Ahead and Storage
Storing Leftovers
Store any leftover cherry pie loosely covered with foil or plastic wrap at room temperature for up to two days. After that, it’s best to refrigerate it to keep the filling fresh. Proper storage ensures the crust remains flaky and the filling stays flavorful.
Freezing
You can freeze this pie either before or after baking. Wrap it tightly with plastic wrap and then foil to prevent freezer burn. Frozen pie will keep well for up to two months. When ready to enjoy, thaw it in the refrigerator overnight before reheating.
Reheating
Reheat pie slices gently in a preheated 350-degree Fahrenheit oven for 10 to 15 minutes to keep the crust crisp and the filling warm. Avoid microwaving, as this can make the crust soggy and the filling unevenly heated.
FAQs
Can I use frozen cherries for this pie instead of fresh?
Yes, frozen cherries can work, but make sure to thaw and drain them first to avoid excess liquid which might make the pie filling too runny. You may also need to adjust the amount of tapioca to compensate.
What is the purpose of the tapioca in this recipe?
Tapioca acts as a thickener that helps the cherry filling set properly without becoming watery, ensuring you get a perfect slice every time without a runny mess.
Can I make this pie gluten-free?
Absolutely! Substitute the pie pastry with a gluten-free crust recipe or store-bought gluten-free dough. The filling stays deliciously the same, packed with cherry goodness.
Is it necessary to let the pie cool before serving?
Yes, cooling is essential. It allows the filling to firm up, so you get clean slices and the flavors to meld beautifully for a truly delicious experience.
How long does this pie keep fresh once baked?
When stored properly at room temperature, it stays fresh for up to two days, and refrigerated it can last for about 4 to 5 days. Just be sure to cover it well to preserve moisture and flavor.
Final Thoughts
This Baked Fresh Cherry Pie Recipe is a shining example of how a handful of simple, fresh ingredients can come together to create something truly magical. Whether you’re baking for family, friends, or yourself, this pie radiates warmth and nostalgia in every bite. Don’t hesitate to roll up your sleeves and dive in — the joy of baking and the reward of savoring a homemade cherry pie is worth every moment.
Print
Baked Fresh Cherry Pie Recipe
- Prep Time: 20 minutes
- Cook Time: 50 minutes
- Total Time: 3 hours 10 minutes
- Yield: 1 9-inch pie (serves 8)
- Category: Dessert
- Method: Baking
- Cuisine: American
Description
Experience the classic delight of a homemade Baked Fresh Cherry Pie featuring a flaky double crust filled with a sweet and tangy cherry filling enhanced by almond and vanilla extracts. Perfectly baked to a golden brown crust, this dessert is a timeless treat that captures the essence of fresh cherries in every bite.
Ingredients
Pie Crust
- 1 recipe pastry for a 9-inch double crust pie
Filling
- 4 tablespoons quick-cooking tapioca
- ⅛ teaspoon salt
- 1 cup white sugar
- 4 cups pitted cherries
- ¼ teaspoon almond extract
- ½ teaspoon vanilla extract
- 1 ½ tablespoons butter
Instructions
- Preheat Oven: Preheat your oven to 400 degrees F (205 degrees C). Prepare the pie pan by placing the bottom crust inside it, and set the top crust aside covered to prevent drying.
- Mix Filling: In a large mixing bowl, combine the quick-cooking tapioca, salt, white sugar, pitted cherries, almond extract, and vanilla extract. Allow this mixture to stand for 15 minutes to let the tapioca absorb moisture and thicken the filling.
- Assemble Pie: Pour the cherry mixture evenly over the bottom crust in the pie pan. Dot the filling with 1 ½ tablespoons of butter for added richness and flavor.
- Add Top Crust: Cover the filling with the top crust. Seal the edges by fluting them to secure and create a decorative edge. Cut vents in the top crust to allow steam to escape during baking.
- Prepare for Baking: Place the pie on a foil-lined cookie sheet to catch any potential drips and keep your oven clean.
- Bake Pie: Bake the pie in the preheated oven for 50 minutes, or until the crust is golden brown and the filling is bubbly.
- Cool Pie: Once baked, let the pie cool for several hours before slicing. This cooling time allows the filling to set properly for clean slices and optimal flavor.
Notes
- Using quick-cooking tapioca helps thicken the cherry filling while keeping the texture smooth.
- Letting the filling rest before baking allows the flavors to meld and the tapioca to absorb moisture, preventing a runny pie.
- Cutting vents in the top crust helps release steam, preventing the crust from becoming soggy.
- Placing the pie on a foil-lined cookie sheet makes cleanup easier by catching any filling overflow.
- Allowing the pie to cool completely before slicing is crucial for firm, neat slices.


