
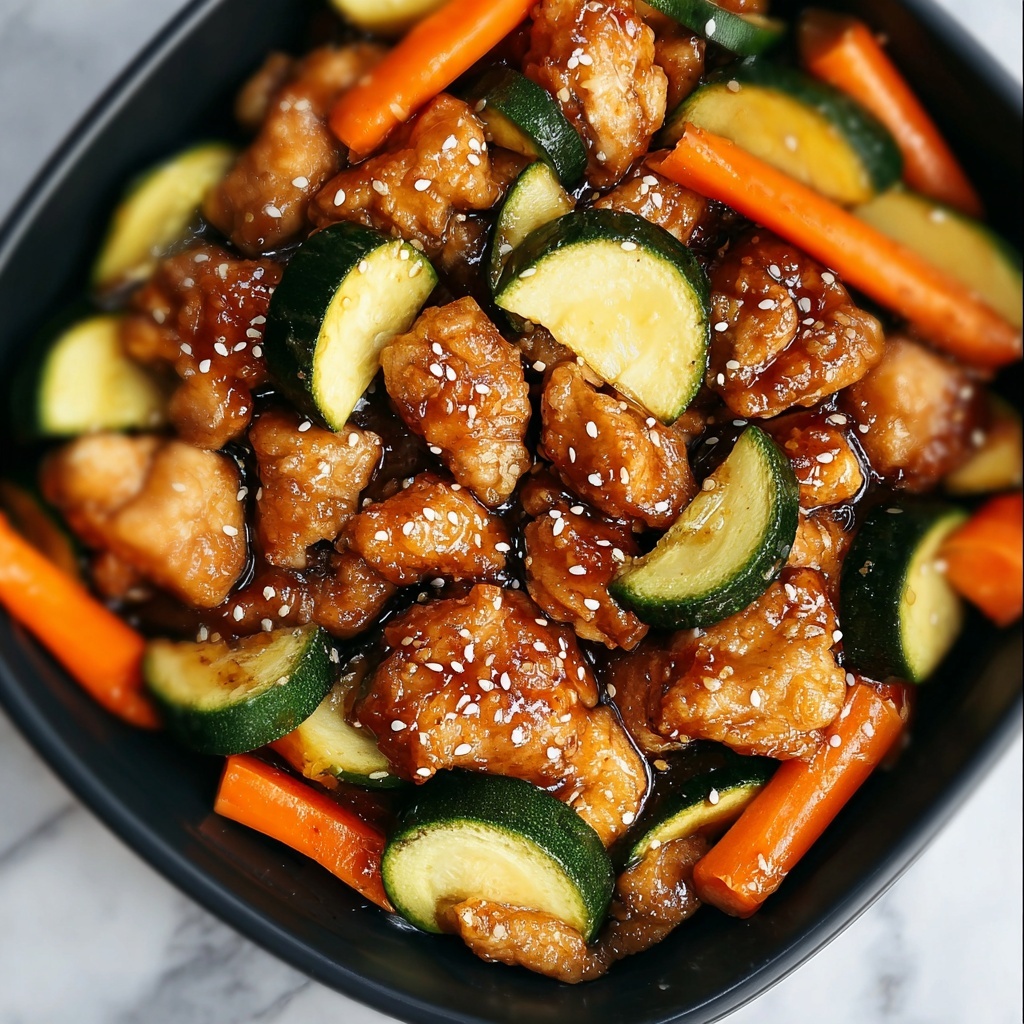
If you’ve ever craved the perfect blend of tender chicken and fresh veggies sizzling with bold, savory flavors, let me introduce you to the Air Fryer Chicken Hibachi Recipe. This vibrant, restaurant-style dish delivers that classic hibachi experience right at home, with minimal fuss and maximum flavor. The magic lies in the succulent, soy-ginger infused chicken paired with crisp-tender zucchini, squash, and carrots, all cooked to perfection in your air fryer for a quick, healthy meal that never disappoints. Trust me, once you try this, it’ll become your go-to weeknight dinner that feels special without the stress.
Ingredients You’ll Need
Simple, wholesome, and packed with flavor—these ingredients are the heart and soul of your Air Fryer Chicken Hibachi Recipe. Each one plays a vital role, from bringing that authentic hibachi flavor to adding freshness and crunch to every bite.
- Chicken breast, cubed: The star protein offering tender, juicy bites when perfectly cooked and seasoned with salt and pepper.
- Zucchini, cubed: Adds a mild, slightly sweet crunch and lovely green color to brighten the plate.
- Squash, cubed: Softens wonderfully in the air fryer and complements the zucchini’s texture.
- Carrot, sliced: Brings a subtle sweetness and vibrant orange hue that balances the savory notes.
- Soy sauce: Delivers that signature umami punch essential for authentic hibachi flavor.
- Sesame oil: Provides a rich, nutty aroma that elevates the entire dish.
- Rice vinegar: Adds bright acidity to cut through richness and boost freshness.
- Minced garlic: Infuses bold, garlicky warmth that melds perfectly with the soy-based sauce.
- Ground ginger: Imparts a gentle zing that balances savory and sweet elements.
- Sesame seeds: Sprinkled on at the end for a delightful toasted crunch and visual appeal.
- Brown sugar (optional): A touch of sweetness to round out the sauce and enhance caramelization.
How to Make Air Fryer Chicken Hibachi Recipe
Step 1: Prepare the Sauce
Start by mixing together soy sauce, sesame oil, rice vinegar, minced garlic, ground ginger, and a little brown sugar if you like it sweeter. This sauce is the heart of the dish, blending salty, nutty, tangy, and sweet flavors to give your chicken and veggies that irresistible hibachi taste. Whisk it well until everything is combined into a silky marinade.
Step 2: Coat the Chicken and Vegetables
Next, toss the cubed chicken breast along with the zucchini, squash, and carrot slices into a large bowl. Pour over the freshly prepared sauce, then gently toss so every piece is thoroughly coated with that delicious marinade. This ensures each bite is packed with flavor and keeps the chicken moist during cooking.
Step 3: Arrange in Air Fryer
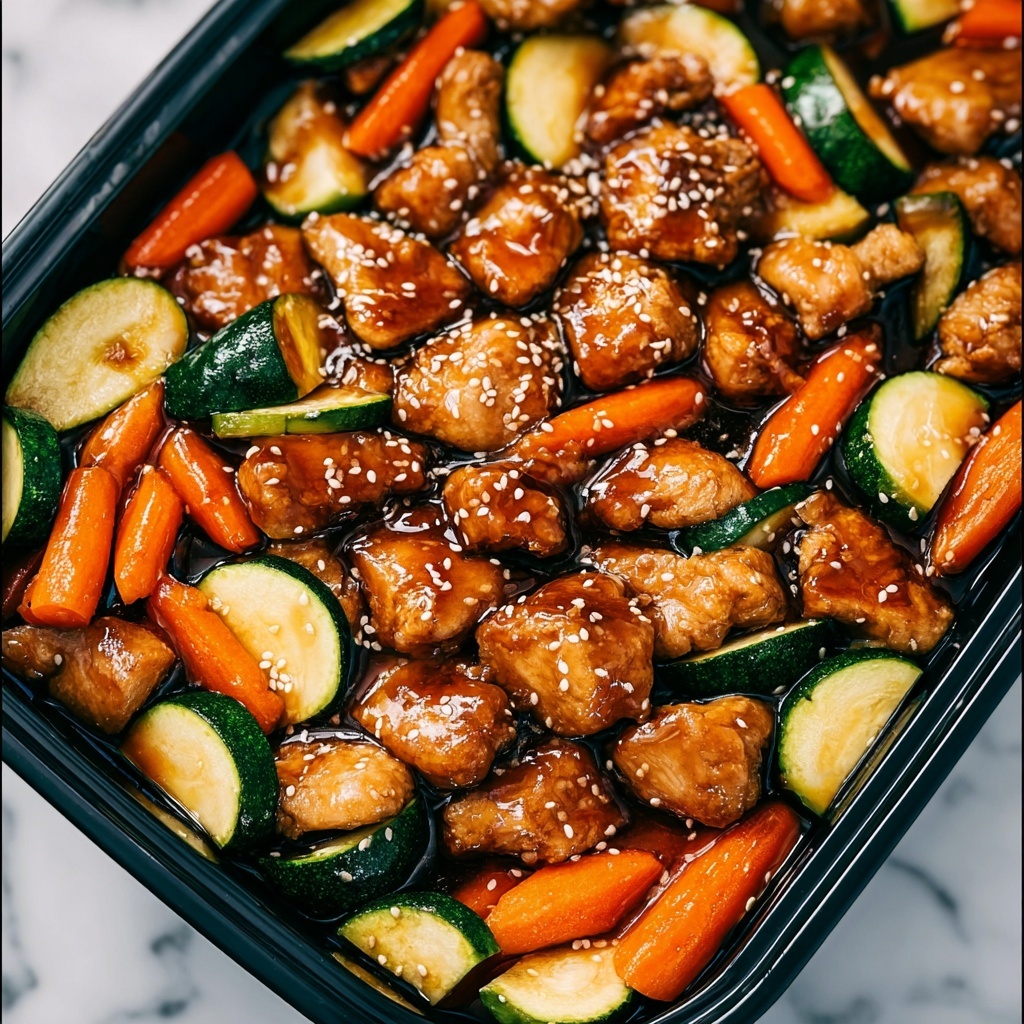
Carefully transfer the coated chicken and vegetables into your air fryer basket in a single layer. Avoid overcrowding, because proper air circulation is key to achieving that perfect sear and even cooking. If needed, cook in batches to maintain crispiness and juiciness.
Step 4: Air Fry
Set your air fryer to 380°F (193°C) and cook for about 15-20 minutes. Make sure to pause every 5 minutes to shake the basket or gently stir the ingredients. This little step helps everything cook evenly and develop a lovely browned finish, giving you that true hibachi-style look and taste.
Step 5: Finish and Serve
Once your chicken and vegetables are cooked through and have a beautiful golden-brown edge, transfer them onto a serving dish. Sprinkle with toasted sesame seeds for added crunch and flavor right before serving. This part adds that final touch of authenticity and makes it look almost too good to eat—though you’ll be digging in immediately!
How to Serve Air Fryer Chicken Hibachi Recipe
Garnishes
Fresh garnishes can elevate your Air Fryer Chicken Hibachi Recipe from good to absolutely memorable. Chopped green onions add a sharp, fresh bite and a splash of color. A wedge of lemon or lime can brighten flavors with a quick squeeze just before eating. For heat lovers, a sprinkle of crushed red pepper flakes or a drizzle of spicy mayo brings a nice kick.
Side Dishes
This dish pairs spectacularly with simple steamed rice or cauliflower rice for a lower-carb option. Fried rice or garlic noodles work beautifully if you want to mimic that authentic hibachi vibe. A light cucumber salad or miso soup can also complement the meal by adding refreshing contrast and warmth.
Creative Ways to Present
Want to impress your dinner guests or make family mealtime more fun? Serve the chicken and vegetables right in mini cast iron skillets or colorful bowls. Layer the sauce-coated ingredients over a bed of rice in bento-style boxes for an easy, elegant presentation. Garnish with edible flowers or extra sesame seeds for visual wow-factor that makes you smile before the first bite.
Make Ahead and Storage
Storing Leftovers
If you happen to have leftovers (which is rare because this recipe is irresistible), store them in an airtight container in the refrigerator. They will keep well for up to 3 days. Make sure the chicken and veggies have cooled completely before sealing to maintain freshness and prevent sogginess.
Freezing
For longer storage, you can freeze the cooked chicken and vegetables. Portion them out into freezer-safe containers or bags and freeze for up to 2 months. When you’re ready to enjoy them, thaw overnight in the refrigerator for best results.
Reheating
To bring leftovers back to life, reheat gently in the air fryer at 350°F for 5-7 minutes to regain crispiness without drying out the chicken. Alternatively, microwave on medium power in short bursts, stirring in between to evenly warm the dish.
FAQs
Can I use other vegetables in the Air Fryer Chicken Hibachi Recipe?
Absolutely! Feel free to swap or add bell peppers, mushrooms, broccoli, or snap peas based on your preference. Just keep the pieces similar in size for even cooking.
What if I don’t have an air fryer?
You can cook this recipe on the stovetop in a large skillet or wok over medium-high heat. Sauté the chicken first, then add the vegetables and sauce, stirring frequently until everything is cooked through.
Can I use thigh meat instead of breast?
Yes, boneless, skinless chicken thighs are a delicious alternative, offering more juiciness and flavor. Adjust cooking time slightly as thighs may take a few minutes longer to cook through.
Is this Air Fryer Chicken Hibachi Recipe gluten-free?
It can be! Simply use gluten-free tamari or soy sauce to avoid wheat, and double-check that all other ingredients fit your dietary needs.
How do I adjust the recipe for more servings?
Just multiply all ingredients accordingly and cook in batches if your air fryer basket is small, to avoid overcrowding and ensure even cooking.
Final Thoughts
This Air Fryer Chicken Hibachi Recipe is one of those treasures that make weeknight dinners exciting and full of flavor without complicated prep. It’s quick, healthy, and endlessly customizable, letting you bring restaurant-quality tastes to your home kitchen with ease. I can’t wait for you to try it and see just how delicious and satisfying homemade hibachi can be!
Print
Air Fryer Chicken Hibachi Recipe
- Prep Time: 5 minutes
- Cook Time: 20 minutes
- Total Time: 25 minutes
- Yield: 2 servings
- Category: Main Course
- Method: Air Frying
- Cuisine: Japanese
- Diet: Low Fat
Description
This Air Fryer Chicken Hibachi recipe offers a quick and flavorful twist on the classic Japanese hibachi dish. Tender chicken breast cubes and a colorful medley of zucchini, squash, and carrots are marinated in a savory sauce of soy, sesame oil, garlic, and ginger, then air fried to perfection. The result is a healthy, easy-to-make meal that is juicy, slightly caramelized, and packed with vibrant flavors, perfect for a wholesome weeknight dinner.
Ingredients
Protein
- 1 cup chicken breast, cubed, seasoned with salt and pepper
Vegetables
- 1 cup zucchini, cubed
- 1 cup squash, cubed
- 1 cup carrot, sliced
Sauce
- 4 tbsp soy sauce
- 1 tbsp sesame oil
- 1 tsp rice vinegar
- 1 tsp garlic, minced
- ½ tsp ground ginger
- Brown sugar, optional (to taste)
Garnish
- 2 tbsp sesame seeds
Instructions
- Prepare the Sauce: In a bowl, mix together the soy sauce, sesame oil, rice vinegar, minced garlic, ground ginger, and brown sugar if using. Stir well to combine all the flavors into a balanced marinade.
- Coat the Chicken and Vegetables: Add the seasoned cubed chicken breast, zucchini, squash, and sliced carrots to a large bowl. Pour the prepared sauce over the chicken and veggies, tossing thoroughly to ensure every piece is coated evenly with the flavorful sauce.
- Arrange in Air Fryer: Place the marinated chicken and vegetable mixture in a single layer inside the air fryer basket. Avoid overcrowding or stacking to allow even air circulation and uniform cooking.
- Air Fry: Set the air fryer to 380°F (193°C) and cook for 15 to 20 minutes. Every 5 minutes, pause the cooking to shake the basket or gently stir the ingredients to promote even browning and cooking throughout.
- Finish and Serve: Once the chicken is cooked through and the vegetables are tender with a slight caramelized edge, remove from the air fryer. Sprinkle with sesame seeds and serve immediately. This dish pairs wonderfully with steamed rice or cauliflower rice for a complete meal.
Notes
- Ensure the chicken cubes are uniformly sized for even cooking.
- Do not overcrowd the air fryer basket to prevent steaming instead of crisping.
- Adjust brown sugar according to your preferred level of sweetness or omit for a sugar-free version.
- Rice vinegar adds a subtle tang; substituting with apple cider vinegar might change the flavor profile slightly.
- For a lower sodium version, use low-sodium soy sauce.

