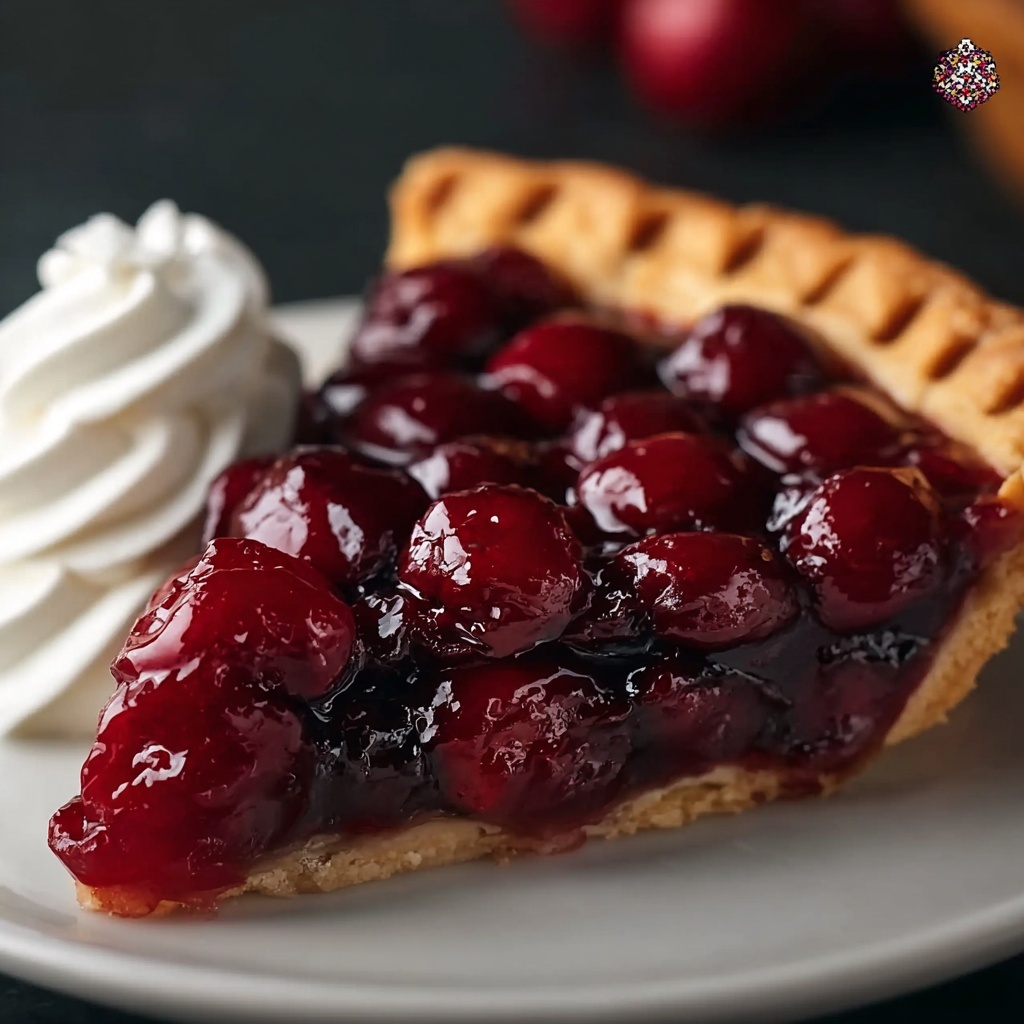
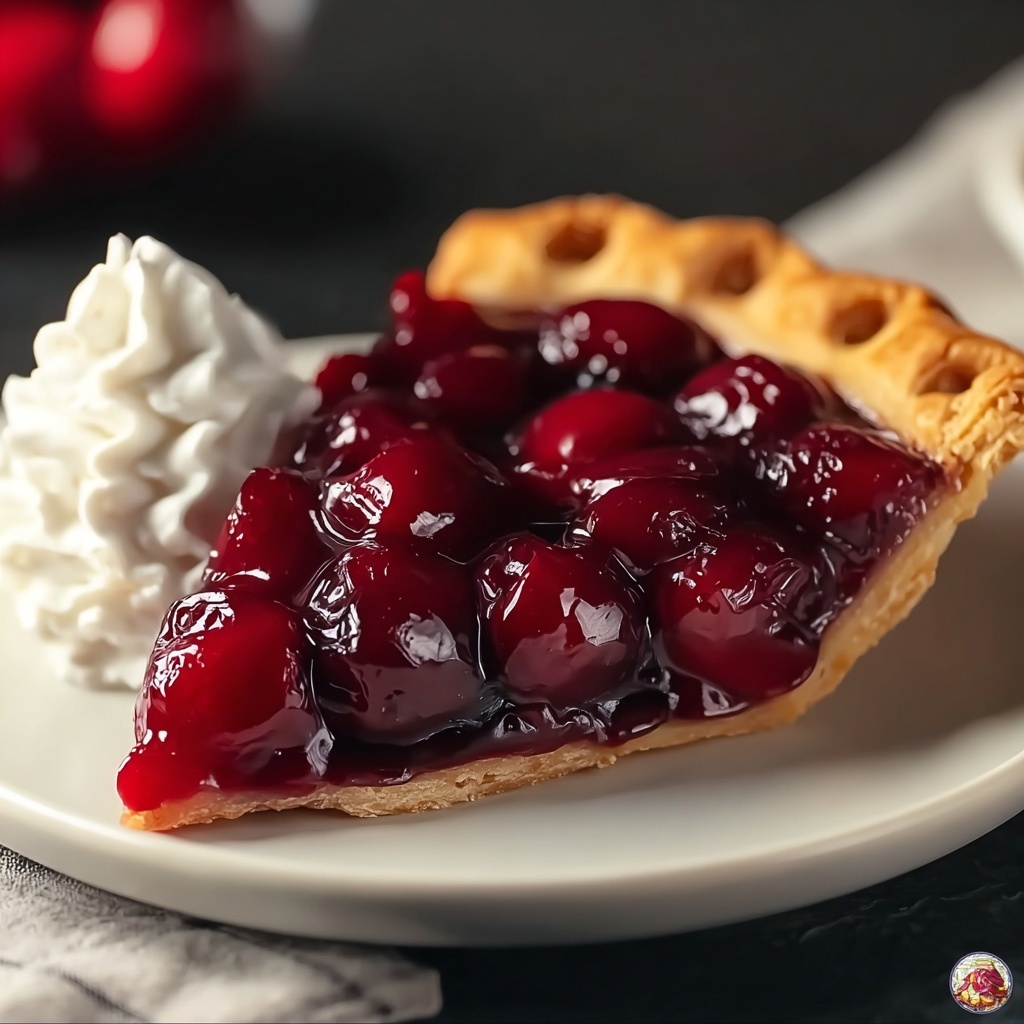
If you’re craving a classic dessert that brings comfort and joy with every bite, the One Crust Cherry Pie with Canned Filling Recipe is your new best friend. This delightful pie combines the sweet-tart pop of cherry pie filling with a perfectly flaky crust that’s easy to assemble and bakes up beautifully golden. Whether you’re a seasoned baker or just starting out, this recipe offers a fuss-free way to impress your family and guests with a timeless treat that tastes like it was made from scratch, using pantry staples you probably already have on hand.

Ingredients You’ll Need
Gathering simple, quality ingredients is the secret to this pie’s delicious flavor and comforting texture. Each component plays a starring role in creating that beautiful balance of sweet, tart, and buttery that makes this pie unforgettable.
- Cherry pie filling (1 can, 21 oz): The heart of the pie, bringing that vibrant cherry flavor and luscious sweetness that shines through every bite.
- Pie crust (1 pre-made crust): Whether store-bought or homemade, it forms the flaky, tender base that holds all the goodness together.
- Lemon juice (1 tbsp, optional): Adds a subtle brightness that lifts and balances the richness of the filling.
- Cornstarch (1 tbsp, optional): Helps thicken the filling for a perfectly set pie without being runny.
- Butter (1 tbsp, optional): A little richness dotted on top enhances the filling’s depth and adds a silky finish.
- Egg (1, optional): Used for an egg wash to give the crust a gorgeous golden color and shiny finish.
- Sugar (1 tbsp): Sprinkled on top to create a sweet, slightly crunchy contrast against the soft crust.
How to Make One Crust Cherry Pie with Canned Filling Recipe
Step 1: Prepare the Pie Crust
Preheat your oven to 350°F (175°C) so it’s warm and ready to bake your masterpiece. If you’re using a store-bought crust, simply unroll it and gently press it into a 9-inch pie pan, making sure it fits snugly without any tears. If you prefer homemade pie crust, roll it out evenly to about 1/8 inch thickness, then press it into your pie pan for that perfect flaky base that will hold all the cherry goodness.
Step 2: Prepare the Filling
Open your can of cherry pie filling and pour it into a bowl. If you want to ensure the filling is beautifully thick, stir in a tablespoon of cornstarch to give it that extra set. To brighten the flavor naturally, you can mix in a tablespoon of lemon juice; it adds a fresh zing that balances the sweet cherries wonderfully. This filling is delicious as it is, but you can also get creative by adding a touch of almond extract or a sprinkle of cinnamon for a personalized twist.
Step 3: Assemble the Pie
Pour the cherry filling evenly into your prepared pie crust, spreading it so every slice gets a generous amount of those luscious cherries. For an extra touch of indulgence, dot the top of the filling with small pieces of butter. This small move creates buttery pockets that melt into the filling while baking, making every bite incredibly rich and smooth.
Step 4: Top the Pie
If you want a beautiful, glossy crust, whisk your egg and gently brush it over the exposed crust edges. Then sprinkle the top lightly with sugar to add a slight crunch and an extra hint of sweetness. This step is optional but definitely worth it for presentation and taste. You can leave the crust as is for a rustic one-crust pie or create a few slits to let the steam escape while baking.
Step 5: Bake the Pie
Place your pie in the oven and bake for 45-50 minutes. You’re looking for a stunning golden crust and bubbling filling that shows the pie is perfectly cooked through. Keep an eye on the crust’s edges. If they start to brown too fast, cover them with aluminum foil or a pie shield to protect them from burning, ensuring a beautifully even bake.
Step 6: Cool and Serve
Once baked, take your pie out and let it cool completely before slicing. This cooling step allows the filling to set fully, so your slices stay neat and don’t spill over. Serve it simply on its own, or dress it up with a dollop of whipped cream or a scoop of cold vanilla ice cream – both pair beautifully with the warm cherry filling.
How to Serve One Crust Cherry Pie with Canned Filling Recipe
Garnishes
A little extra whipped cream or a sprinkle of powdered sugar instantly turns this pie into a showstopper. For something a bit fancy, add sliced almonds or fresh mint leaves for a pop of color and texture. These small flourishes elevate each slice and delight your guests’ senses.
Side Dishes
This cherry pie pairs wonderfully with a light scoop of vanilla ice cream to balance the tart cherries and buttery crust. If you’re serving it as part of a meal, consider simple sides like coffee or herbal tea to complement the sweetness without overpowering the pie’s delicate flavor.
Creative Ways to Present
Try serving slices on pretty plates with a drizzle of chocolate or caramel sauce for an indulgent touch. You could also turn leftover pie into warm cherry pie parfaits layered with whipped cream and crushed graham crackers for a fun dessert twist that keeps the same delightful flavors.
Make Ahead and Storage
Storing Leftovers
Wrap any leftover pie tightly with plastic wrap or aluminum foil and store it in the refrigerator. It will keep fresh for up to 3-4 days, making it an easy go-to dessert to enjoy again or share with friends.
Freezing
This One Crust Cherry Pie with Canned Filling Recipe freezes beautifully. Wrap the whole pie or individual slices in plastic wrap and then foil before popping them in the freezer. It will keep for up to 2 months and can be thawed overnight in the refrigerator whenever a sweet craving hits.
Reheating
To bring back that fresh-baked warmth, reheat pie slices in a preheated oven at 300°F for about 10-15 minutes. Avoid the microwave if you want to preserve the crispness of the crust, but if you’re in a hurry, a quick 30-second zap will do the trick too.
FAQs
Can I use fresh cherries instead of canned filling?
Absolutely! Using fresh cherries requires a bit more prep and cooking for the filling, but it can make an even fresher-tasting pie. Just be sure to add sugar and a thickener like cornstarch to get that perfect consistency.
Is it necessary to use an egg wash on the crust?
Not at all. The egg wash is optional and mainly adds a beautiful golden shine and sparkle to the crust. The pie will still taste delicious without it.
Can I make this pie gluten-free?
Yes! Simply swap the pie crust for a gluten-free version available in many stores or make your own gluten-free crust at home, and follow the rest of the recipe as is.
How do I keep the crust from getting soggy?
Using butter dots on the filling helps, and you can also brush the crust with a thin layer of beaten egg or melted chocolate before adding filling to create a moisture barrier.
What is the best way to serve this pie warm?
Warm slices paired with vanilla ice cream or whipped cream create a delightful contrast of hot and cold, soft and creamy, making each bite extra satisfying.
Final Thoughts
There’s something truly comforting about a warm slice of this One Crust Cherry Pie with Canned Filling Recipe, especially when it’s made with love and simple ingredients. It’s a wonderful dessert to share, celebrate, or just enjoy on a cozy afternoon. So, roll up your sleeves and give this charming pie a try—you’ll soon find it’s a staple you want to revisit time and time again!
Print
One Crust Cherry Pie with Canned Filling Recipe
- Prep Time: 15 minutes
- Cook Time: 45 minutes
- Total Time: 1 hour
- Yield: 8 servings
- Category: Dessert
- Method: Baking
- Cuisine: American
Description
This easy and delicious One Crust Cherry Pie features a luscious canned cherry pie filling tucked into a flaky pre-made crust. Enhanced with optional ingredients like lemon juice and butter for extra brightness and richness, this classic dessert is perfect for any occasion. The simple preparation and baking process ensures a beautiful golden crust and a bubbly fruit filling, ready to be enjoyed warm or chilled with your favorite toppings.
Ingredients
Pie Crust
- 1 pre-made pie crust (store-bought or homemade)
Filling
- 1 can (21 oz) cherry pie filling (or more if preferred)
- 1 tablespoon lemon juice (optional, for extra brightness)
- 1 tablespoon cornstarch (optional, to thicken the filling)
- 1 tablespoon butter (optional, for added richness)
Topping
- 1 egg (optional, for egg wash to glaze the crust)
- 1 tablespoon sugar (for sprinkling on top)
Instructions
- Prepare the Pie Crust: Preheat your oven to 350°F (175°C). Unroll the store-bought pie crust and place it into a 9-inch pie pan, pressing gently to fit it well. If using a homemade crust, roll it out to about 1/8 inch thickness before fitting it into the pan.
- Prepare the Filling: Open the canned cherry pie filling and pour it into a bowl. Stir in 1 tablespoon of cornstarch if you desire a thicker filling. Add 1 tablespoon of lemon juice for extra brightness. Optionally, enhance the flavor with a dash of almond extract or a sprinkle of cinnamon.
- Assemble the Pie: Pour the cherry filling evenly into the prepared pie crust. Dot the top of the filling with small pieces of butter (about 1 tablespoon) for a richer flavor.
- Top the Pie: If you want a glossy crust, whisk the egg and lightly brush it over the crust edges. Sprinkle 1 tablespoon of sugar on top to add texture and sweetness. You may create a few slits on the crust for ventilation or leave it whole for a simple one-crust pie.
- Bake the Pie: Place the pie in the preheated oven and bake for 45-50 minutes until the crust is golden brown and the filling is bubbly. To prevent the crust edges from burning, cover them with aluminum foil or a pie shield if they brown too quickly.
- Cool and Serve: Remove the pie from the oven and allow it to cool completely so the filling can set and prevent spilling when sliced. Serve warm or at room temperature with whipped cream or vanilla ice cream as desired.
Notes
- Using cornstarch helps thicken the canned filling for a firmer slice.
- Lemon juice brightens the flavor, but is optional.
- Adding butter on top of the filling enriches the taste and adds a subtle buttery finish.
- Egg wash will give the crust a shiny, attractive golden color.
- Cover crust edges with foil if they brown too early to avoid burning.
- Allow the pie to cool fully to ensure the filling sets properly.


