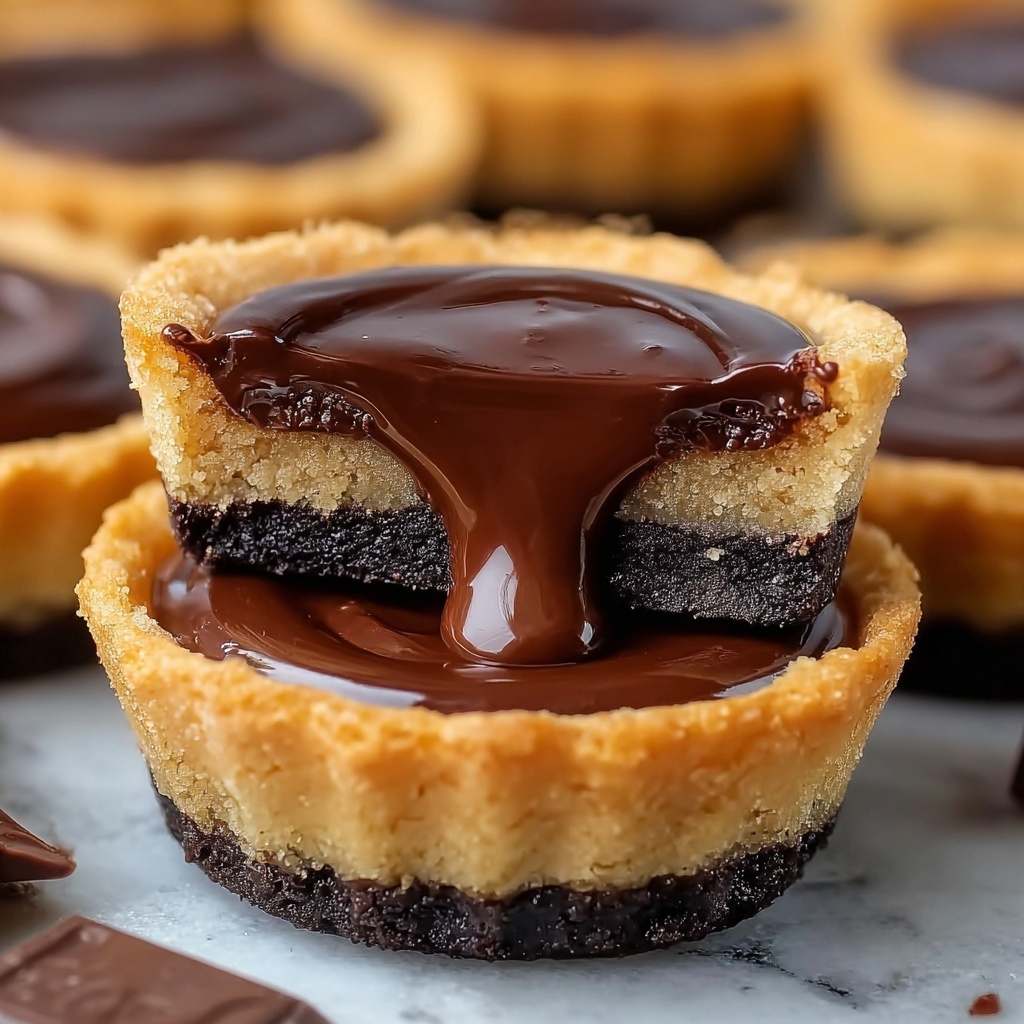
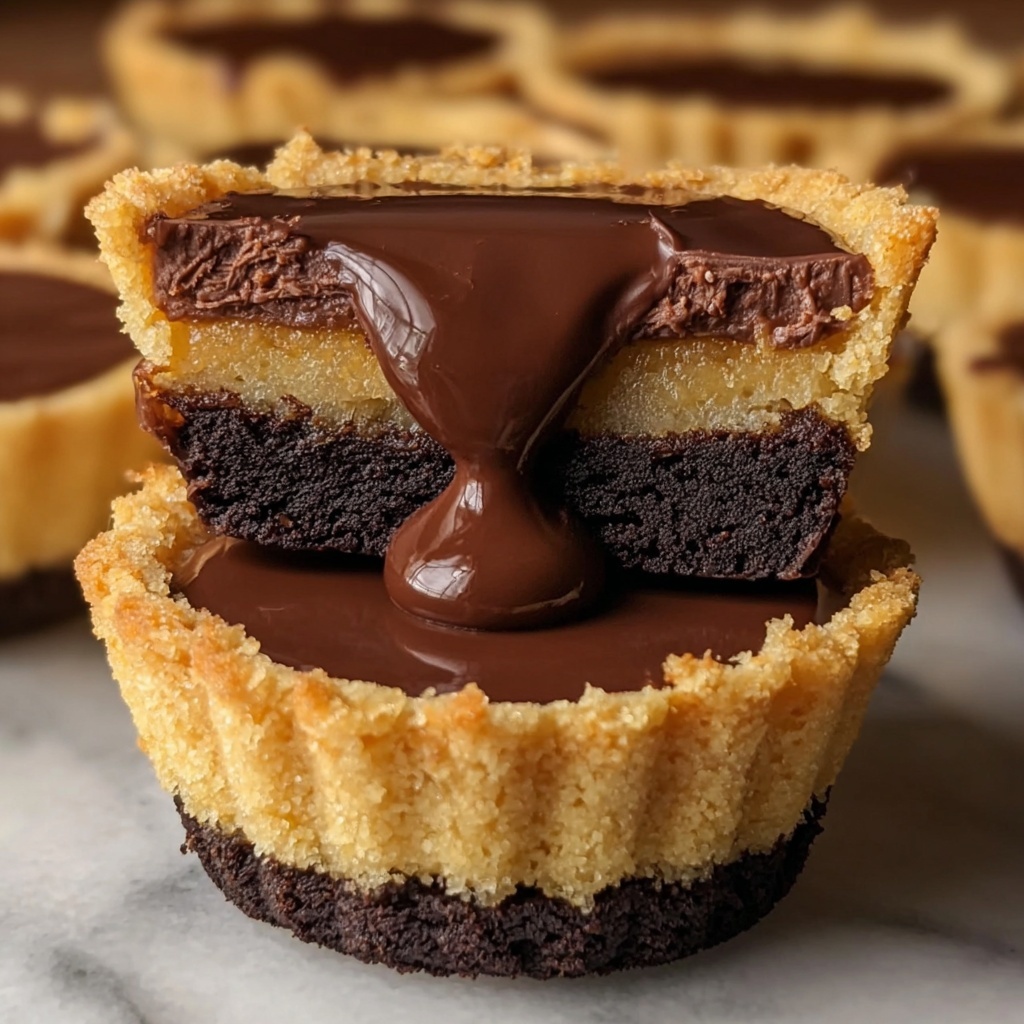
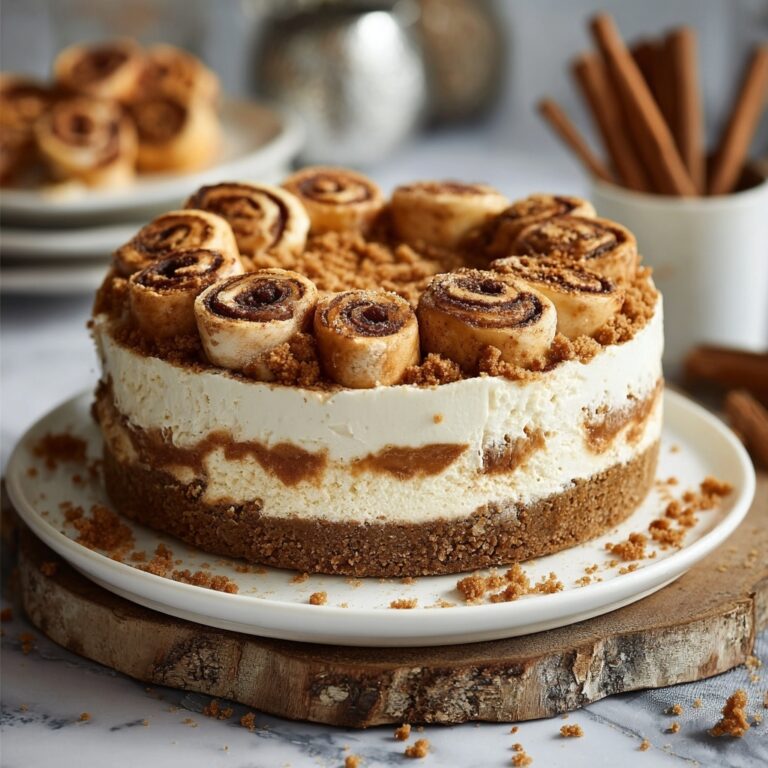
If you have a sweet tooth and love a perfect combination of crunchy cookie, luscious caramel, and silky chocolate, the Twix Cookie Cups Recipe is an absolute must-try. This delightful treat captures the essence of the classic Twix candy bar in bite-sized cookie cups that are easy to make and irresistible to eat. Imagine rich cookie bases cradling gooey caramel, all topped with a smooth chocolate layer – every bite is a joyful party for your taste buds. Trust me, once you try this Twix Cookie Cups Recipe, it will quickly become a beloved favorite to share with family, friends, or simply enjoy on your own!
Ingredients You’ll Need
The magic of this Twix Cookie Cups Recipe lies in its simple, everyday ingredients that work harmoniously to create incredible flavor and texture. Each component plays an essential role, from the buttery cookie base to the smooth caramel and rich chocolate topping.
- All-purpose flour: The sturdy base for the cookie cups, providing structure and chewiness.
- Baking soda: Helps the cookies rise just enough while keeping them tender.
- Salt: Balances sweetness and enhances all other flavors.
- Butter (softened): Adds richness and tenderness to the cookie dough.
- Granulated sugar: Contributes sweetness and lightly caramelizes the edges for a golden finish.
- Brown sugar (packed): Gives moisture and a deeper, caramel-like flavor to the cookie base.
- Large egg: Binds the ingredients together while lending softness.
- Vanilla extract: Provides warmth and depth, enhancing the overall taste.
- Sweetened condensed milk: The backbone of the luscious caramel filling, adding creaminess and sweetness.
- Light brown sugar (packed): Adds chewy texture and deep caramel notes to the filling.
- Butter: Gives the caramel its rich, silky texture.
- Milk chocolate chips: Perfect for melting into a smooth, sweet chocolate topping.
How to Make Twix Cookie Cups Recipe
Step 1: Preheat and Prepare Your Pan
Start by preheating your oven to 350°F (175°C). Grease a mini muffin tin or line it with paper liners to ensure easy removal after baking. This little step sets the stage for perfectly shaped cookie cups that hold all the delicious fillings.
Step 2: Make the Cookie Dough
Whisk together the flour, baking soda, and salt in a medium bowl to combine the dry ingredients evenly. In a separate bowl, beat together the softened butter, granulated sugar, and brown sugar until light and fluffy. Then, mix in the egg and vanilla extract until thoroughly combined. Gradually add the dry ingredients to the wet mixture, stirring until a soft dough forms. This dough has the perfect balance of softness and structure to hold the fillings.
Step 3: Form the Cookie Cups
Scoop about one tablespoon of dough into each muffin cup and press it down to form a flat base. Use your fingers or the back of a spoon to create a small indentation in the center of each cup—this will be the cozy spot for the caramel filling. This step is key to getting that classic Twix shape with a little pocket for the gooey caramel.
Step 4: Bake the Cookie Cups
Bake the cookie cups for 8 to 10 minutes until the edges turn a lovely golden brown. Once baked, let them cool in the muffin tin for five minutes so they firm up enough to handle without breaking. Then, transfer them to a wire rack to cool completely. Cooling fully is important because you don’t want the caramel to melt into the cookies.
Step 5: Prepare the Caramel Filling
Make your luscious caramel filling by combining sweetened condensed milk, light brown sugar, butter, and salt in a small saucepan. Cook over medium heat, stirring constantly, until the mixture thickens and simmers, usually about 5-7 minutes. Remove from heat, then stir in the vanilla extract. This homemade caramel is rich, creamy, and perfectly sticky—ideal for filling your cookie cups.
Step 6: Assemble the Twix Cups
When the cookie cups have cooled, spoon about a teaspoon of the caramel filling into each indentation. This gooey layer is what separates these cookie cups from ordinary cookies and recreates that irresistible Twix charm in every bite.
Step 7: Add the Chocolate Topping
Melt the milk chocolate chips in a microwave-safe bowl, heating in 30-second bursts and stirring in between until smooth. Spoon the melted chocolate over the caramel filling, gently smoothing it out with a spoon for an even chocolate cap. This final touch adds the sweet chocolatey finish that you crave.
Step 8: Chill and Set
Place your assembled Twix cookie cups in the refrigerator for about 30 minutes, or until the chocolate sets completely. Chilling ensures that each layer solidifies nicely, making the cookie cups easy to handle and perfect to serve.
Step 9: Serve and Enjoy
Once set, your Twix Cookie Cups Recipe is ready to enjoy! Serve them chilled or at room temperature, and prepare for all the compliments to come your way. These little treats are sure to be a hit at any gathering or as a delightful homemade indulgence.
How to Serve Twix Cookie Cups Recipe

Garnishes
Elevate your cookie cups with a sprinkle of sea salt flakes atop the chocolate for a sweet-salty twist that intensifies the caramel flavor. You could also add a tiny drizzle of caramel or a few crushed Twix bits for added texture and eye-catching detail.
Side Dishes
Pair these cookie cups with a scoop of vanilla ice cream or a dollop of whipped cream for a classic dessert experience. A cup of rich coffee or warm hot chocolate also complements the sweetness perfectly, making any snack or dessert time feel special.
Creative Ways to Present
Arrange your Twix cookie cups on a decorative platter lined with parchment paper or festive doilies for a charming presentation. For parties, place them in mini cupcake wrappers or gift boxes tied with ribbon to make stunning edible favors that will brighten anyone’s day.
Make Ahead and Storage
Storing Leftovers
Keep leftover Twix cookie cups in an airtight container at room temperature for up to two days, or refrigerate them to maintain freshness for up to a week. Proper storage preserves the cookie’s texture and keeps the caramel and chocolate layers intact.
Freezing
You can freeze the cookie cups for longer storage. Arrange them in a single layer on a baking sheet and freeze until solid, then transfer to a sealed container or freezer bag. They will keep well for up to three months. Thaw at room temperature or in the refrigerator before serving.
Reheating
Since these are delightful treats best enjoyed chilled or at room temperature, reheating is not usually necessary. If you prefer a softer texture, let them sit at room temperature for 10 to 15 minutes, but avoid microwaving as it may melt the caramel and chocolate layers unevenly.
FAQs
Can I use dark or white chocolate instead of milk chocolate?
Absolutely! Feel free to swap the milk chocolate chips for dark chocolate if you prefer a richer taste or white chocolate for a sweeter twist. Each option adds a different flavor profile to your Twix Cookie Cups Recipe.
Are these cookie cups gluten-free?
The traditional recipe uses all-purpose flour, which contains gluten. However, you can try a gluten-free flour blend as a substitute, but results may vary slightly in texture.
How big are these Twix cookie cups?
They are made in mini muffin tins, so each cookie cup is bite-sized—perfect for a little indulgence without overdoing it. You can double the dough for larger cups but adjust baking time accordingly.
Can I make the caramel filling ahead of time?
Yes, you can prepare the caramel in advance and keep it refrigerated in an airtight container for up to a week. Reheat gently to soften before filling the cookie cups.
What if I don’t have a mini muffin tin?
If you don’t have a mini muffin tin, you can use a regular muffin tin and increase the dough and caramel amounts accordingly, but the shape will be larger. Another option is a silicone mold with similar-sized cavities to maintain the signature bite-size shape.
Final Thoughts
The Twix Cookie Cups Recipe is an absolute joy to make and even more delightful to eat. It brings together familiar, comforting flavors into an easy-to-share, perfectly portioned treat that’s sure to impress everyone who tries it. Whether you’re baking for a special occasion or an everyday sweet fix, these cookie cups are a delicious way to spread some happiness. Give this recipe a try and watch how quickly they disappear – you won’t regret it!
Print
Twix Cookie Cups Recipe
- Prep Time: 15 minutes
- Cook Time: 10 minutes
- Total Time: 40 minutes
- Yield: 12 mini cookie cups
- Category: Dessert
- Method: Baking
- Cuisine: American
Description
These delightful Twix Cookie Cups combine a soft cookie base with a luscious homemade caramel filling and a smooth chocolate topping, creating a perfect bite-sized treat that mimics the classic Twix candy bar. Easy to make and perfect for gatherings, these cookie cups offer a delicious blend of chewy, creamy, and chocolaty textures.
Ingredients
Cookie Dough
- 1 cup All-purpose flour
- 1/4 tsp Baking soda
- 1/4 tsp Salt
- 1/2 cup Butter (softened)
- 1/4 cup Granulated sugar
- 1/4 cup Brown sugar (packed)
- 1 Large egg
- 1 tsp Vanilla extract
Caramel Filling
- 1/2 cup Sweetened condensed milk
- 1/4 cup Light brown sugar (packed)
- 2 tbsp Butter
- 1/8 tsp Salt
- 1/2 tsp Vanilla extract
Chocolate Topping
- 1 cup Milk chocolate chips (or your favorite chocolate)
Instructions
- Preheat oven: Preheat the oven to 350°F (175°C). Grease a mini muffin tin or line it with paper liners to prepare for baking the cookie cups.
- Make the cookie dough: In a medium bowl, whisk together the all-purpose flour, baking soda, and salt. In a separate larger bowl, beat the softened butter, granulated sugar, and brown sugar until light and fluffy. Add the egg and vanilla extract, mixing until fully combined. Gradually incorporate the dry ingredients into the wet mixture until a smooth dough forms.
- Form the cookie cups: Scoop approximately 1 tablespoon of dough into each muffin tin cup. Press the dough down to create a flat base, then use your fingers or the back of a spoon to make a small indentation in the center of each cookie cup to hold the filling later.
- Bake the cookie cups: Bake in the preheated oven for 8 to 10 minutes or until the edges turn golden brown. Remove from the oven and allow the cups to cool in the tin for about 5 minutes before transferring them to a wire rack to cool completely.
- Prepare the caramel filling: In a small saucepan, combine the sweetened condensed milk, light brown sugar, butter, and salt. Cook over medium heat, stirring constantly until the mixture thickens and begins to simmer, around 5 to 7 minutes. Remove from heat and stir in the vanilla extract to finish the caramel.
- Assemble the Twix cups: When the cookie cups are fully cooled, spoon about 1 teaspoon of caramel into each indentation, filling it evenly.
- Add the chocolate topping: Melt the milk chocolate chips in a microwave-safe bowl by heating in 30-second intervals, stirring between intervals until completely smooth. Spoon a small amount of melted chocolate over the caramel layer in each cup, smoothing it gently with a spoon.
- Chill and set: Place the assembled cookie cups in the refrigerator for approximately 30 minutes to allow the chocolate topping to harden and set properly.
- Serve: Once the chocolate has set, serve the Twix cookie cups chilled or at room temperature and enjoy these delicious treats!
Notes
- You can substitute milk chocolate chips with dark or white chocolate according to preference.
- Be careful not to overbake the cookie cups to maintain a soft, chewy texture.
- Use a non-stick muffin tin or paper liners for easy removal of cookie cups.
- The caramel filling can be made ahead of time and stored refrigerated for up to three days.
- Store leftovers in an airtight container in the refrigerator for up to one week.


