
“`html
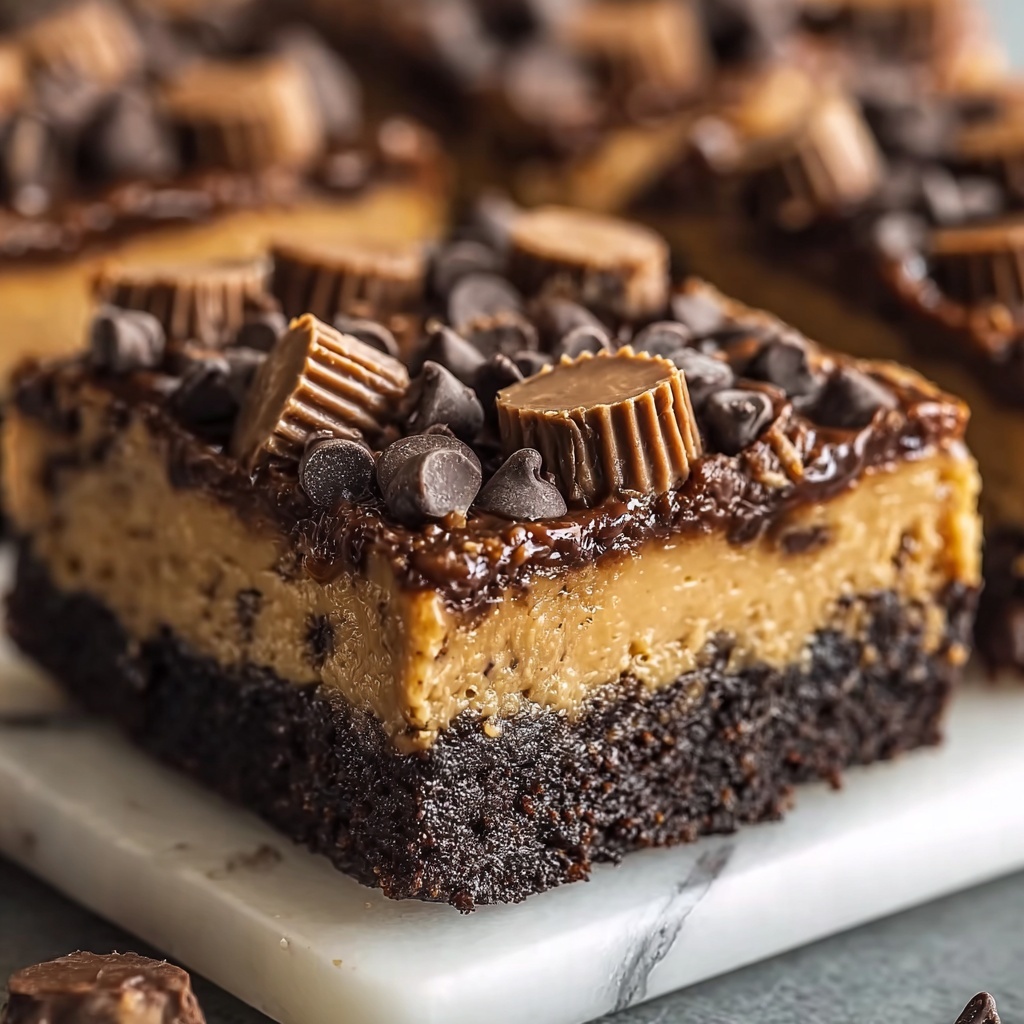
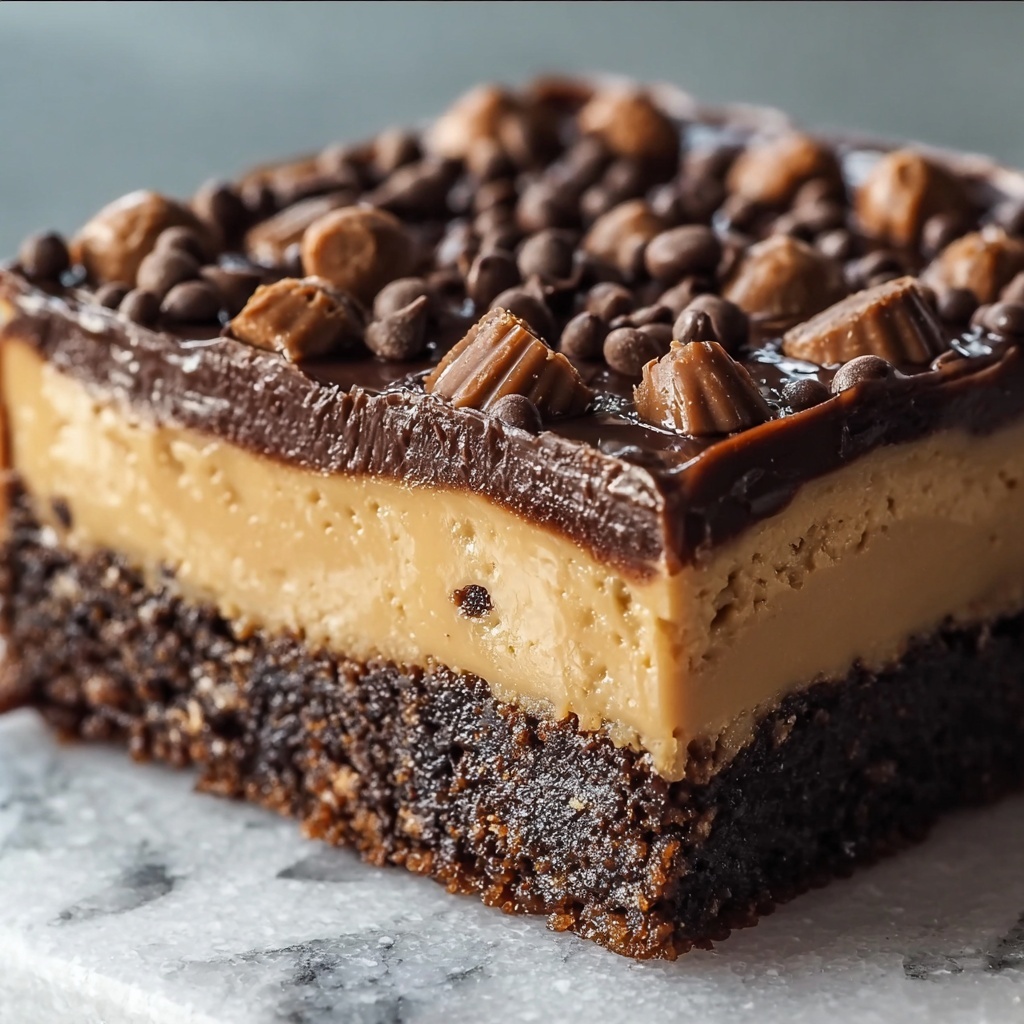
If you have a sweet tooth that’s always on the lookout for something truly decadent, the Peanut Butter Cup Dump Cake Recipe is going to be your new obsession. This luscious dessert layers rich chocolate cake with creamy peanut butter goodness and is studded with those irresistible Reese’s peanut butter cups that melt into each bite with pure delight. From its fudgy base to the fluffy, dreamy topping, every forkful tastes like a celebration, and the best part is how effortlessly it all comes together. Whether you’re baking for a crowd or just craving a cozy treat, this dump cake dazzles with its perfect blend of flavors and textures without requiring hours in the kitchen.
Ingredients You’ll Need
This Peanut Butter Cup Dump Cake Recipe shines because of its simple, straightforward ingredients that each play a key role in crafting layers of irresistible flavor and texture. Every component, from the chocolate cake mix to the creamy peanut butter layer, builds on the next to create a dessert that’s as pleasing to the eye as it is to the palate.
- Chocolate cake mix (2 boxes, 15.25 oz each): The foundation of this dessert, offering a moist and rich chocolate base that’s easy to prepare.
- Instant chocolate pudding mix (1 package, 3.9 oz): Adds extra chocolate flavor and a luscious, fudgy texture that makes the cake irresistible.
- Milk (1 ½ cups): Creates the perfect batter consistency, blending seamlessly with the cake and pudding mixes.
- Reese’s peanut butter cups minis (8 oz, unwrapped): These delightful morsels melt into the batter, distributing bursts of peanut buttery sweetness throughout.
- Cream cheese (8 oz, softened): Adds richness and a creamy dimension to the peanut butter layer, balancing the sweetness.
- Creamy peanut butter (½ cup): Infuses the cake with that signature peanut butter flavor everyone craves.
- Powdered sugar (1 cup): Sweetens the cream cheese layer smoothly without graininess.
- Heavy whipping cream (¼ cup): Lightens the cream cheese and peanut butter blend for a silky texture.
- Butter (1 stick, melted): Drizzled over the dry cake mix topping to create a golden, crisp finish.
- Dry cake mix from the 2nd box: Used as a crunchy topping when baked with butter, adding texture contrast.
- Cool Whip (8 oz): Toppings layer that adds a light, fluffy finish to the cake.
- Reese’s peanut butter cups miniatures (12 oz, unwrapped and chopped): Sprinkled on top for extra chocolate-peanut buttery crunch and eye-catching appeal.
- Chocolate syrup: Drizzled over the final cake for richness and a glossy, decadent look.
How to Make Peanut Butter Cup Dump Cake Recipe
Step 1: Prepare Your Pan and Oven
Start by preheating your oven to 350°F (175°C). This ensures the cake will bake evenly from the moment it hits the oven. Next, grab a 13″x9″ baking pan and generously coat it with non-stick spray so your cake lifts out effortlessly without sticking.
Step 2: Mix the Chocolate Base
In a large mixing bowl, combine one box of the chocolate cake mix with the instant chocolate pudding mix and milk. Stir until the mixture is smooth and velvety. Now, gently fold in the first batch of unwrapped Reese’s peanut butter cups minis, distributing these peanut buttery gems evenly through the batter. Pour this luscious batter into your prepared pan and spread it out evenly – this layer is the chocolatey heart of your dump cake.
Step 3: Create the Cream Cheese Peanut Butter Layer
Time to get creamy! In another bowl, beat together the softened cream cheese, creamy peanut butter, powdered sugar, and heavy whipping cream until the mixture is silky smooth. This spread is what takes the cake to the next level by adding that rich, peanut butter creaminess. Carefully spread this layer over your chocolate batter, ensuring a nice even cover.
Step 4: Add the Crunchy Topping
Here’s a fun part: sprinkle the dry cake mix from your remaining box evenly over the cream cheese layer. Then, drizzle the melted butter generously on top – this little trick will bake into a crispy, golden crust that adds delightful texture contrast to every bite.
Step 5: Bake to Perfection
Pop the pan into the preheated oven and bake for 35 to 40 minutes. Once done, test the center with a toothpick – it should come out clean, signaling your cake is perfectly baked. Allow the cake to cool completely inside the pan; patience here helps the layers set beautifully and keeps your topping intact.
Step 6: The Final Fluff and Garnish
Once the cake has cooled, spread a generous layer of Cool Whip over the top for an airy, creamy finish. Sprinkle the chopped Reese’s peanut butter cups miniatures over the Cool Whip for that irresistible, peanut buttery crunch with every bite. Finish with a drizzle of chocolate syrup – this adds shiny appeal and an extra dose of chocolatey indulgence.
Step 7: Serve and Share
Grab a big spoon because this cake is pure joy. Serve it at your next gathering or enjoy it as a comforting solo treat. Every bite delivers a luscious mix of chocolate, peanut butter, creamy layers, and crunchy topping — a guaranteed crowd-pleaser.
How to Serve Peanut Butter Cup Dump Cake Recipe
Garnishes
Beyond the chopped Reese’s and chocolate syrup, you can sprinkle some roasted chopped peanuts or a dusting of cocoa powder for a hint of bitterness that beautifully complements the sweet layers. Fresh mint leaves can add a surprising pop of color and brightness if you want to get fancy.
Side Dishes
This dump cake pairs wonderfully with a scoop of vanilla or coffee ice cream, which melts over the warm cake creating sticky-sweet bites. If you want a lighter pairing, fresh berries or a fruit salad balance richness with refreshing tang.
Creative Ways to Present
For parties, consider layering this cake in a large glass trifle bowl where the distinct layers shine through. Alternatively, turn it into individual servings by using ramekins or decorative dessert cups, topped with a mini peanut butter cup for a charming presentation.
Make Ahead and Storage
Storing Leftovers
After tasting the magic, you’ll want leftovers. Store them covered tightly in the refrigerator for up to 2 to 3 days. This keeps the layers moist and the topping fresh without drying out or absorbing fridge odors.
Freezing
You can freeze this dump cake, but it’s best to do so before adding the Cool Whip topping. Wrap the baked and cooled cake tightly in plastic wrap and foil, then freeze for up to 2 months. Thaw overnight in the refrigerator before topping and serving.
Reheating
Reheat individual slices in the microwave in 20-second bursts until warmed through, especially if you plan to top with fresh Cool Whip afterward. Avoid reheating the whole cake as it can disturb the layers and texture.
FAQs
Can I substitute regular peanut butter for creamy?
Yes! However, creamy peanut butter blends more smoothly into the cream cheese layer, while chunky peanut butter will add a bit of texture. Adjust based on your preference, but creamy is recommended for the silkiest result.
What if I don’t have Reese’s peanut butter cups minis?
You can use regular-sized peanut butter cups chopped into smaller pieces or even peanut butter chips for a similar effect. The key is to have that peanut butter and chocolate combo distributed throughout the layers.
Is this dessert very sweet?
This dump cake strikes a delicious balance between rich chocolate and peanut butter sweetness, lifted by the tangy cream cheese and light Cool Whip. If you prefer less sweetness, you might lightly reduce the powdered sugar in the peanut butter cream layer.
Can I make this cake vegan or dairy-free?
With substitutions like dairy-free cream cheese alternatives, plant-based milk, and vegan Cool Whip, this recipe can be adapted. Keep in mind that baking times and textures might vary with these swaps.
Why is it called a “dump cake”?
The term “dump cake” comes from the ease of assembly – you “dump” the ingredients into a pan and bake without complicated mixing steps. It’s perfect for busy days when you want a delicious treat with minimal effort.
Final Thoughts
This Peanut Butter Cup Dump Cake Recipe is truly a treasure for anyone who loves chocolate and peanut butter in equal parts. It’s simple to make but feels effortlessly luxurious, perfect for celebrations or whenever you need a comforting slice of heaven. Give it a try—you might just find your new favorite dessert to share (or keep all to yourself)!
“`
Print
Peanut Butter Cup Dump Cake Recipe
- Prep Time: 15 minutes
- Cook Time: 35-40 minutes
- Total Time: 50-55 minutes
- Yield: 12-16 servings
- Category: Dessert
- Method: Baking
- Cuisine: American
Description
This indulgent Peanut Butter Cup Dump Cake combines rich chocolate cake batter with creamy peanut butter and cream cheese layers, topped with Cool Whip and chopped Reese’s peanut butter cups for a decadent, crowd-pleasing dessert perfect for any occasion.
Ingredients
Cake Layer
- 2 boxes chocolate cake mix (15.25 oz/432g each)
- 1 package instant chocolate pudding mix (3.9 oz/110g)
- 1 ½ cups milk (375mL)
- 1 bag Reese’s peanut butter cups minis (8 oz/226g, unwrapped)
Cream Cheese Peanut Butter Layer
- 8 oz cream cheese, softened (227g)
- ½ cup creamy peanut butter
- 1 cup powdered sugar (105g)
- ¼ cup heavy whipping cream (57g)
Topping
- 1 stick butter, melted (113g)
- Dry cake mix from the second box
Finishing Touches
- 8 oz Cool Whip (225g)
- 1 bag Reese’s peanut butter cups miniatures (12 oz/340g, unwrapped and chopped)
- Chocolate syrup, for garnish
Instructions
- Preheat and Prepare Pan: Preheat your oven to 350°F (175°C) and coat a 13″x9″ (33×23 cm) baking pan with non-stick spray to prevent sticking.
- Mix Cake Batter: In a large mixing bowl, combine one box of chocolate cake mix, instant chocolate pudding mix, and milk. Stir until the mixture is smooth and well blended. Fold in the Reese’s mini peanut butter cups gently to distribute them evenly throughout the batter. Pour this batter into the prepared pan and spread it out evenly.
- Prepare Cream Cheese Peanut Butter Layer: In a separate bowl, beat together the softened cream cheese, creamy peanut butter, powdered sugar, and heavy whipping cream until the mixture is smooth and creamy. Spread this layer evenly over the chocolate cake batter in the baking pan.
- Add Dry Topping and Butter: Sprinkle the dry cake mix from the second box evenly over the cream cheese peanut butter layer. Then drizzle the melted butter across the top to help create a moist and flavorful topping.
- Bake the Cake: Place the pan in the preheated oven and bake for 35-40 minutes or until a toothpick inserted into the center comes out clean. After baking, allow the cake to cool completely in the pan to set the layers properly.
- Apply Finishing Touches: Once the cake is fully cooled, spread the Cool Whip evenly over the top layer. Then sprinkle chopped Reese’s peanut butter cups miniature pieces over the Cool Whip for added texture and peanut butter flavor. Finish by drizzling chocolate syrup as a garnish over the top.
- Serve and Store: Serve the peanut butter cup dump cake chilled or at room temperature. Store any leftovers covered in the refrigerator for up to 2-3 days to maintain freshness.
Notes
- Ensure the cake is fully cooled before adding the Cool Whip topping to prevent it from melting.
- You can substitute the instant chocolate pudding mix with a regular chocolate pudding for a thicker texture but adjust milk quantity accordingly.
- For extra crunch, consider adding chopped peanuts on top along with the chopped peanut butter cups.
- Use room temperature cream cheese to ensure smooth blending.
- This cake is rich and best enjoyed in moderate portions due to its high calorie and fat content.


