
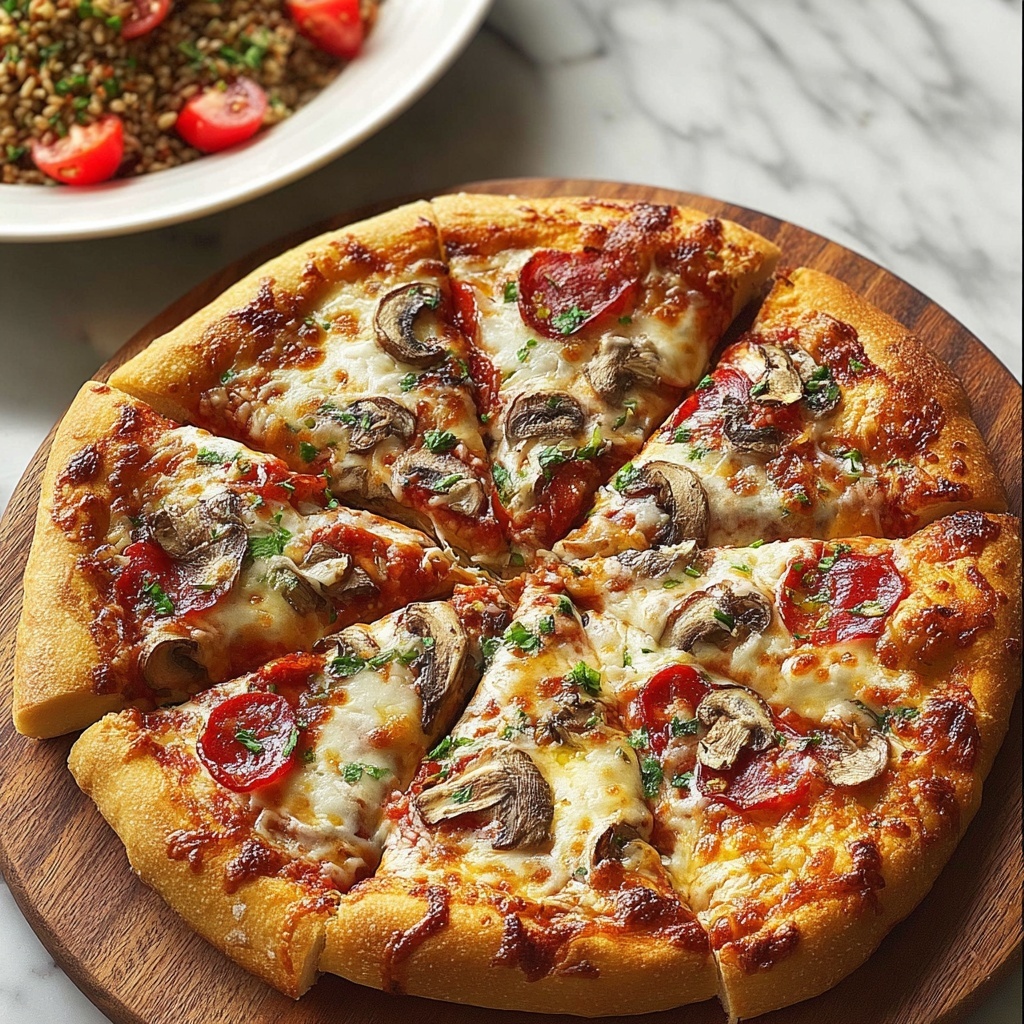
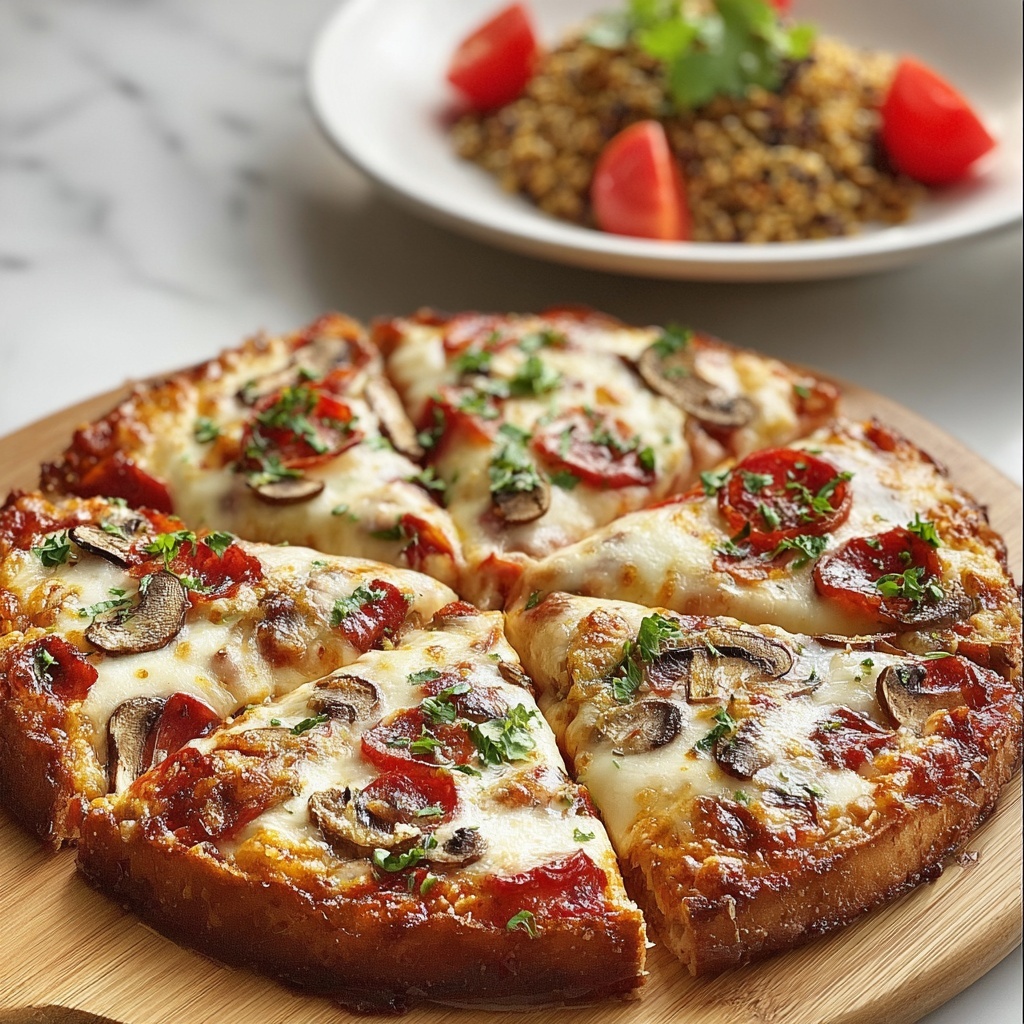
If you have ever dreamed of crafting the perfect pie from scratch, this Homemade Classic Pizza with Custom Toppings Recipe is going to make your kitchen your favorite place to be. It’s all about that golden, crispy crust layered with melty mozzarella, tangy sauce, and whatever fresh toppings you love most. The joy here is in tailoring each pizza exactly how you want it, making every bite comforting and utterly irresistible. Whether it’s a Friday night treat or a weekend project with friends, this recipe brings the pizzeria experience straight to your home.
Ingredients You’ll Need
Getting started on this Homemade Classic Pizza with Custom Toppings Recipe is delightfully simple, thanks to a handful of essential ingredients that each play a crucial role in texture, flavor, and aroma. From the chewy crust to the rich sauce and gooey cheese, every component shines.
- All-purpose flour (2 1/2 cups): Provides the perfect balance of structure and softness for a tender yet sturdy crust.
- Sugar (1 teaspoon): Feeds the yeast and helps the crust develop a lovely golden color during baking.
- Salt (1 teaspoon): Enhances the dough’s flavor and balances the sweetness of the sauce and cheese.
- Active dry yeast (2 1/4 teaspoons/1 packet): The magical rising agent that gives the dough its airy, chewy texture.
- Warm water (1 cup at 110°F/45°C): Activates the yeast perfectly without killing it, ensuring a good rise.
- Olive oil (2 tablespoons): Adds a subtle richness to the dough and helps crisp the crust edges.
- Pizza sauce (1/2 cup): The vibrant, zesty base flavor that brings moisture and depth to your pizza.
- Shredded mozzarella cheese (2 cups): Melts beautifully to create that irresistible, gooey topping everyone loves.
- Custom toppings of your choice: Whether it’s pepperoni, mushrooms, colorful bell peppers, onions, sausage, or a mix, these bring personal flair and bursts of flavor to each slice.
How to Make Homemade Classic Pizza with Custom Toppings Recipe
Step 1: Activate the Yeast
Begin by blending the warm water, sugar, and yeast in a large mixing bowl and let the mixture sit for about 5 minutes. You’ll know it’s ready when it becomes foamy on top, which signals that the yeast is alive and kicking, set to give your dough its perfect rise.
Step 2: Combine and Form Dough
Add the flour, salt, and olive oil into the yeast mixture. Stir everything together until a dough starts forming. This is your pizza’s foundation, so make sure the ingredients meld into a somewhat sticky, cohesive ball before moving on.
Step 3: Knead the Dough
Flour your surface generously and knead your dough for about 10 minutes. The goal is smoothness and elasticity, which means you are developing the gluten that will give the crust structure and chewiness. It’s a therapeutic step where you can feel the transformation under your hands.
Step 4: Let the Dough Rise
Place your dough ball into a greased bowl and cover it with a clean kitchen towel or plastic wrap. Leave it in a warm spot to rise for about an hour until it doubles in size. This rise is essential for a light, airy crust that will bake up beautifully.
Step 5: Preheat Your Oven
Set your oven to a hot 475°F (245°C). If you have a pizza stone, now’s the time to place it in the oven so it gets nice and sizzling, creating a perfectly crisp bottom crust as your pizza bakes.
Step 6: Roll Out the Dough
After your dough has doubled, punch it down gently to release the air bubbles. Then roll it out to your preferred thickness on a floured surface. This step lets you customize the crust from thin and crispy to thick and chewy, depending on your mood.
Step 7: Add Sauce, Cheese, and Toppings
Transfer your rolled dough to a greased baking sheet or pizza peel if you’re using a pizza stone. Spread an even layer of your vibrant pizza sauce, sprinkle all that melty mozzarella over the top, and finish with your custom toppings, layering to your heart’s content.
Step 8: Bake to Perfection
Bake your pizza for 10 to 12 minutes until the crust is golden and the cheese bubbles and gets those tempting brown spots. This is where all your hard work comes together in a gorgeous, savory masterpiece ready to be devoured.
Step 9: Cool and Slice
Give your pizza a few minutes to cool slightly—this helps the cheese set a bit so it doesn’t slide off when you cut. Slice into generous pieces, and you’re ready to enjoy a fresh, homemade classic pie with all your favorite toppings.
How to Serve Homemade Classic Pizza with Custom Toppings Recipe
Garnishes
Adding fresh garnishes can elevate your pizza experience. A handful of fresh basil leaves, a drizzle of extra virgin olive oil, or a sprinkle of crushed red pepper flakes add layers of freshness, aroma, and a killer finishing touch to your homemade classic pizza with custom toppings recipe.
Side Dishes
Balance the richness of your pizza with some crisp, refreshing sides like a tangy Caesar salad, roasted garlic green beans, or a simple coleslaw. These sides provide contrasting textures and help turn your pizza night into a well-rounded feast everyone will love.
Creative Ways to Present
For a fun twist, try slicing your pizza into smaller squares for a party platter or serving it with dipping sauces like garlic butter or spicy marinara. You can also pair it with a chilled glass of your favorite drink, turning your homemade classic pizza with custom toppings recipe into an unforgettable meal experience.
Make Ahead and Storage
Storing Leftovers
Cool any leftover pizza completely before storing it in an airtight container. Keeping slices in the fridge preserves their flavor and texture for up to 3-4 days, making for fantastic next-day lunches or dinners.
Freezing
If you want to save pizza for later, wrap individual slices tightly in plastic wrap and then foil to prevent freezer burn. Frozen pizza slices can last up to 2 months and provide a quick, delicious meal whenever you need it.
Reheating
To bring your leftover pizza back to life, reheat it in a preheated oven at 375°F for 8-10 minutes or until the crust is crispy and the cheese is melty again. Avoid the microwave if you want to keep that crunch; using an oven or a skillet is your best bet for a fresh-from-the-oven bite.
FAQs
Can I use whole wheat flour instead of all-purpose flour?
Absolutely, whole wheat flour adds a nutty flavor and extra fiber, but it may make the dough a bit denser. You can also try a blend of whole wheat and all-purpose flour for a lighter texture while enjoying the health benefits.
How do I know when the dough has risen enough?
The dough should roughly double in size and feel soft and pillowy to the touch. If you gently poke it with your finger, the indentation should slowly bounce back, indicating it’s ready for the next step.
Can I prepare the dough ahead of time?
Yes! You can prepare the dough up to a day in advance, cover it tightly, and refrigerate. When ready, bring it back to room temperature before rolling out and baking.
What if I don’t have a pizza stone?
No worries at all! A regular baking sheet works perfectly for this recipe. For crispier crust, preheat the baking sheet in the oven before placing your pizza on it, mimicking the heat retention of a stone.
How can I make my pizza crust crispier?
Try rolling your dough thinner and baking at a high temperature (475°F) on a preheated surface like a pizza stone or inverted baking sheet. Brushing the edges with olive oil before baking also helps develop a golden, crisp crust.
Final Thoughts
Making pizza at home with this Homemade Classic Pizza with Custom Toppings Recipe is incredibly rewarding and fun, especially when you get to decide every delicious detail. It’s a wonderful way to bring people together and enjoy a delicious meal that feels both special and comforting. Grab your favorite toppings, roll up your sleeves, and treat yourself to the ultimate pizza experience any night of the week!
Print
Homemade Classic Pizza with Custom Toppings Recipe
- Prep Time: 15 minutes
- Cook Time: 12 minutes
- Total Time: 1 hour 27 minutes
- Yield: 8 servings (8 slices)
- Category: Main Course
- Method: Baking
- Cuisine: Italian
- Diet: Vegetarian
Description
This Homemade Pizza recipe guides you through making a classic, delicious pizza from scratch with a soft, chewy crust, flavorful pizza sauce, melted mozzarella cheese, and your choice of toppings. Perfect for a family meal or entertaining guests, this easy-to-follow recipe ensures a crispy, golden crust baked in a hot oven for the best results.
Ingredients
Dough
- 2 1/2 cups all-purpose flour
- 1 teaspoon sugar
- 1 teaspoon salt
- 2 1/4 teaspoons active dry yeast (1 packet)
- 1 cup warm water (110°F/45°C)
- 2 tablespoons olive oil
Toppings
- 1/2 cup pizza sauce
- 2 cups shredded mozzarella cheese
- Toppings of your choice (pepperoni, mushrooms, bell peppers, onions, sausage, etc.)
Instructions
- Activate yeast: In a large mixing bowl, combine warm water, sugar, and yeast. Let it sit for about 5 minutes until foamy, indicating the yeast is active and ready to use.
- Form dough: Add flour, salt, and olive oil to the yeast mixture. Stir until a dough begins to form, bringing all ingredients together.
- Knead dough: On a floured surface, knead the dough for about 10 minutes until it is smooth and elastic. This develops gluten for a chewy texture.
- Let dough rise: Place the dough in a greased bowl, cover it, and let it rise in a warm place for about 1 hour or until it has doubled in size.
- Preheat oven: Preheat your oven to 475°F (245°C). For best results, place a pizza stone in the oven while preheating to get a crispier crust.
- Shape dough: Punch down the risen dough and roll it out on a floured surface to your desired thickness for the crust.
- Add toppings: Transfer the dough to a baking sheet or pizza peel. Spread pizza sauce evenly over the surface, sprinkle with shredded mozzarella cheese, and add your preferred toppings.
- Bake pizza: Bake in the preheated oven for 10-12 minutes until the crust is golden and the cheese is bubbly and lightly browned.
- Serve: Allow the pizza to cool for a few minutes to set the toppings, then slice and serve hot.
Notes
- Make sure water is warm but not hot to prevent killing the yeast.
- Kneading the dough well is essential for texture.
- You can customize the toppings to suit your preference.
- Using a pizza stone helps achieve a crispier crust but is optional.
- Letting the dough rise properly makes the pizza light and airy.
- If you don’t have a pizza peel, use a baking sheet or flatten the dough directly on greased parchment paper.
