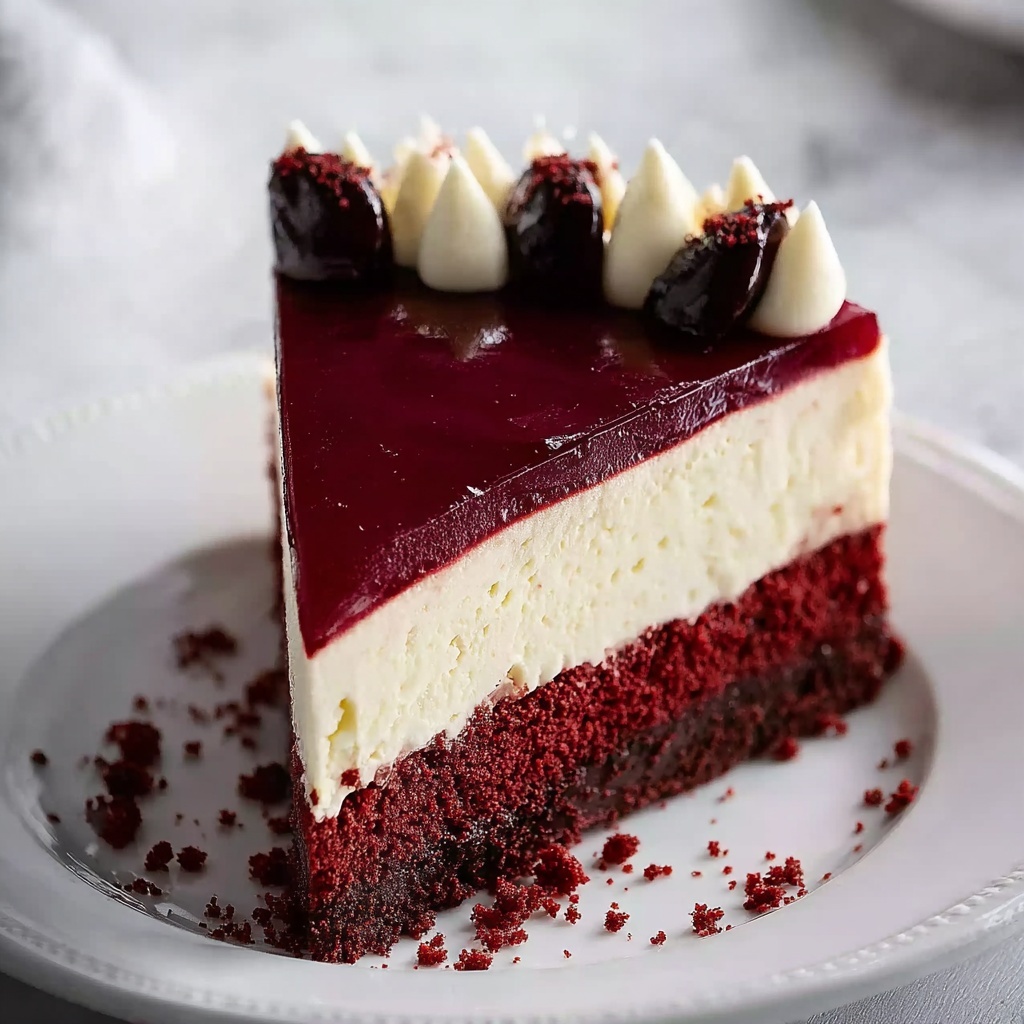
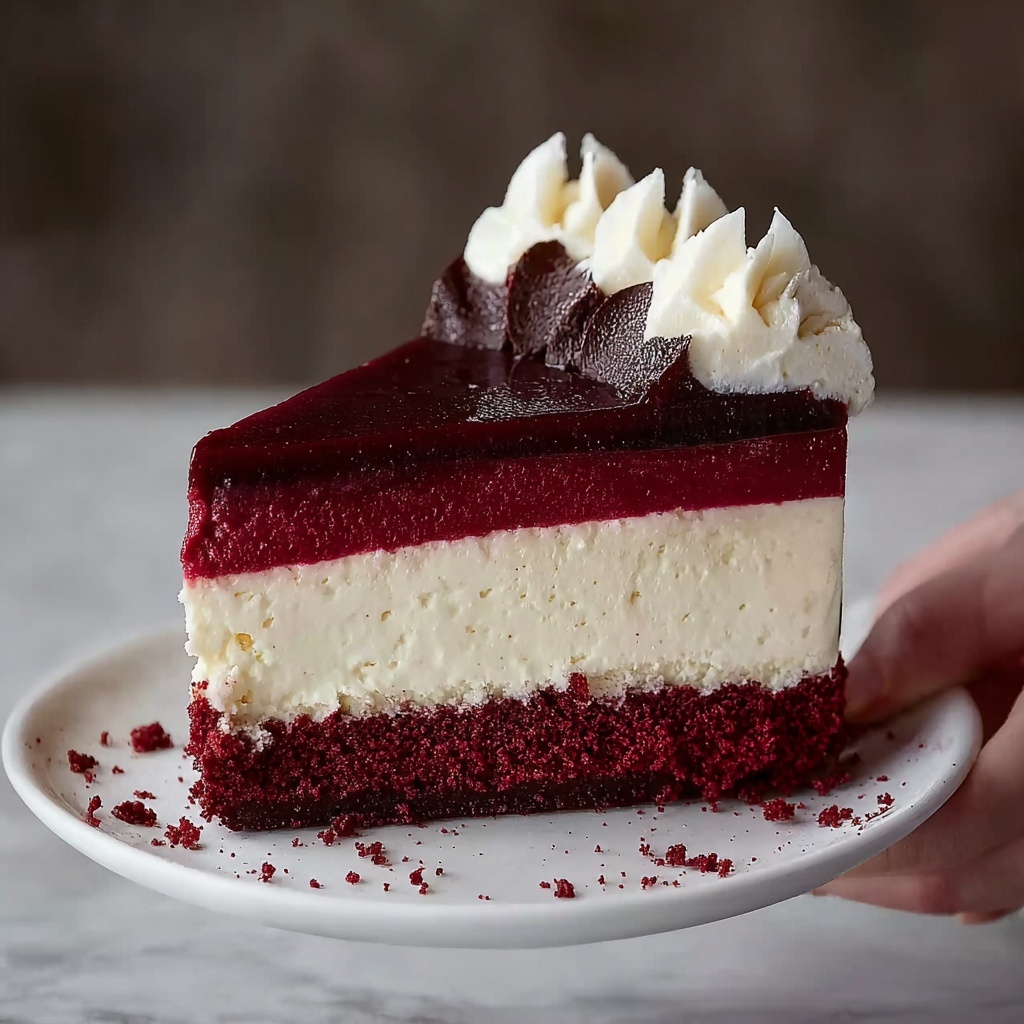
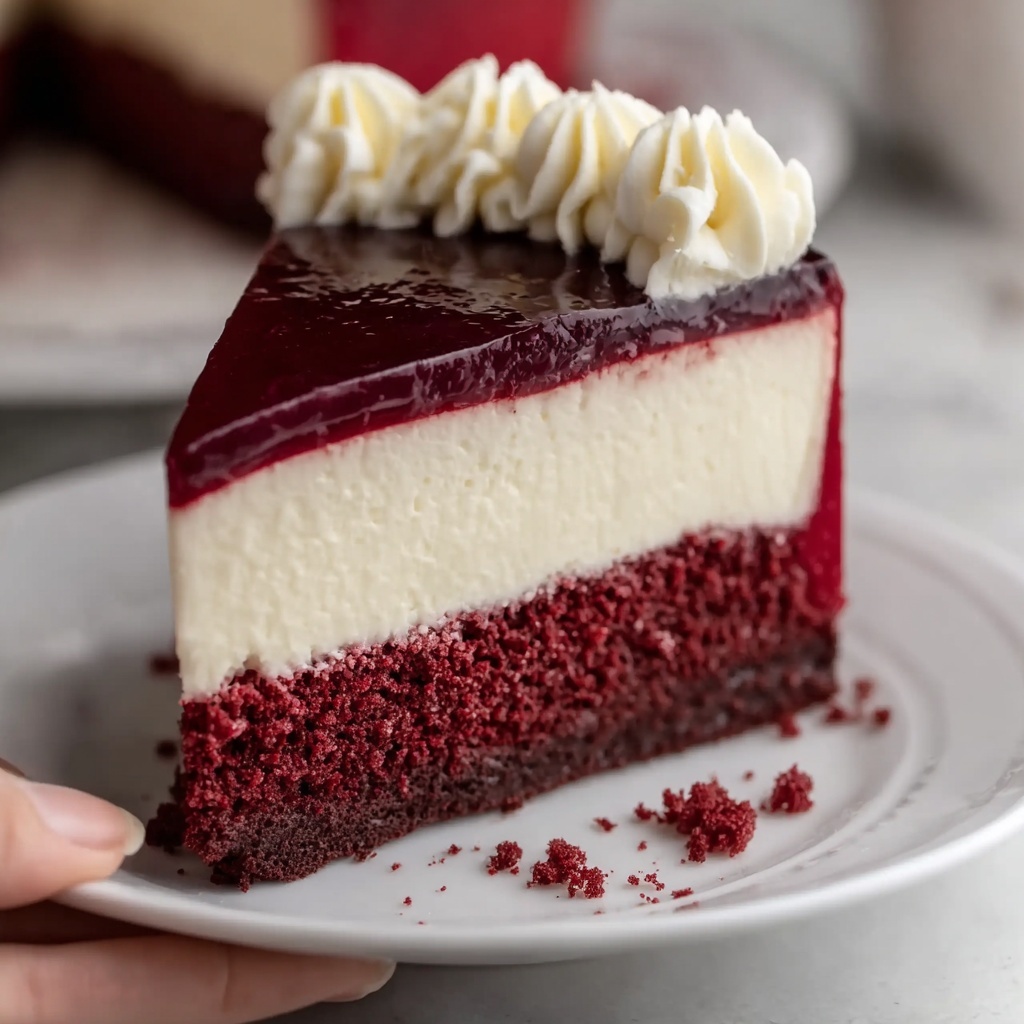
There is something truly magical about indulging in a rich and creamy dessert like this Homemade Red Velvet Cheesecake Recipe. This delightful cake combines the classic, velvety smoothness of red velvet with the luscious tang of cheesecake, creating a dreamy treat that will captivate anyone lucky enough to take a bite. From its crumbly Oreo crust to the perfectly balanced, vibrant red filling and decadent cream cheese frosting, this recipe is an absolute showstopper that’s surprisingly easy to make at home. Whether you’re celebrating a special occasion or simply craving something extraordinary, this cheesecake promises to impress with every forkful.
Ingredients You’ll Need
Getting the ingredients right is crucial to nailing this Homemade Red Velvet Cheesecake Recipe. Each element carries weight, from the Oreo crust that provides a crunchy contrast, to the rich cream cheese that defines the texture, and the red food coloring that gives it that unmistakable red velvet charm. Here’s what you’ll need:
- 2 ½ cups (250 g) crushed Oreo cookies: These create a chocolatey, sturdy crust with a hint of sweetness and crunch.
- 5 tablespoons unsalted butter, melted: Binds the crust and adds a smooth, buttery flavor.
- 32 ounces (908 g) cream cheese, softened: The silky base of the cheesecake, ensuring a creamy, smooth texture.
- 1 ⅓ cups (267 g) granulated sugar: Sweetens the filling perfectly without overpowering it.
- ½ cup (42 g) cocoa powder: Infuses the filling with that subtle chocolate note characteristic of red velvet.
- 1 cup (227 g) sour cream, room temperature: Adds tang and moisture, balancing sweetness with a little zest.
- 1 tablespoon white vinegar: Enhances the red velvet flavor and tenderizes the batter.
- 1 tablespoon vanilla extract: Brings warmth and depth to the cheesecake’s flavor.
- 1-2 ounces red food coloring: Gives the cheesecake its signature brilliant red hue.
- 4 large eggs, room temperature, lightly beaten: Helps bind the filling and create that creamy, dense texture.
- 4 ounces (113 g) cream cheese, softened (for frosting): Adds extra creaminess to the topping.
- ¼ cup (56 g) unsalted butter, softened (for frosting): Makes the frosting luxuriously smooth and rich.
- 2 cups (260 g) confectioners’ sugar (for frosting): Sweetens and thickens the frosting for a perfect finish.
- 1 teaspoon vanilla extract (for frosting): Adds a lovely aromatic note to the topping.
How to Make Homemade Red Velvet Cheesecake Recipe
Step 1: Prepare the Pan and Crust
Start by preheating your oven to 350°F (175°C). To prevent any water from seeping in during the water bath baking, wrap the bottom of a 9-inch springform pan with two layers of heavy-duty aluminum foil. Next, mix the crushed Oreo cookies with the melted butter thoroughly, then press this mixture firmly into the bottom and along the sides of your springform pan. Bake this crust for 10 minutes to set it, then allow it to cool. This step ensures a sturdy base that supports the rich filling perfectly.
Step 2: Mix the Cheesecake Batter
Reduce the oven temperature to 300°F (150°C). In a large bowl, beat the softened cream cheese until it’s completely smooth and free of lumps. Gradually add in the granulated sugar and cocoa powder, mixing carefully to combine. Next, fold in the sour cream, white vinegar, vanilla extract, and red food coloring, taking care to distribute everything evenly to achieve that deliciously vibrant color. Finally, gently incorporate the lightly beaten eggs, mixing just until blended. Overmixing can cause cracks, so be gentle here to maintain a silky texture for your Homemade Red Velvet Cheesecake Recipe.
Step 3: Bake the Cheesecake in a Water Bath
Pour the rich, red velvet batter over the cooled Oreo crust inside your springform pan. For that perfect, crack-free cheesecake texture, place this springform pan inside a larger roasting pan. Carefully pour boiling water into the roasting pan, filling it until it reaches halfway up the sides of the springform pan—this water bath will gently regulate the heat. Bake the cheesecake for 1 hour, then turn off the oven but leave the cake inside the water bath for an additional hour. This slow cooling process is key to achieving that iconic creamy, velvety texture.
Step 4: Cool and Chill the Cheesecake
Once your cheesecake has finished baking and resting in the oven, transfer it to a wire rack to cool completely at room temperature. After cooling, cover the cake and refrigerate it for at least 4 hours, or ideally overnight. This chilling time helps the flavors meld together and the cheesecake to set firmly, making it easier to slice and enjoy.
Step 5: Make the Cream Cheese Frosting and Finish
For the crowning touch on your Homemade Red Velvet Cheesecake Recipe, beat together the softened cream cheese and butter until the mixture is creamy and smooth. Gradually add the confectioners’ sugar and vanilla extract, mixing until the frosting becomes thick and luscious. Once the cheesecake is fully chilled, spread this frosting evenly over the top for a gorgeous, velvety finish that’s as delightful to taste as it is to look at.
How to Serve Homemade Red Velvet Cheesecake Recipe
Garnishes
To elevate presentation, consider garnishing your cheesecake with a few simple yet stunning touches. Fresh berries like raspberries or strawberries bring out the cake’s sweetness and add a pop of color. A sprinkle of crushed Oreos or a dusting of cocoa powder can echo the flavors while adding texture. Alternatively, a drizzle of dark chocolate or a few edible flowers makes this dessert irresistible both visually and flavor-wise.
Side Dishes
This cheesecake shines as the star, but pairing it with light accompaniments can create a perfect dessert spread. A dollop of whipped cream adds an airy contrast to the dense cake, while a scoop of vanilla bean ice cream complements the cheesecake’s richness with creamy coolness. Fresh fruit salad is another refreshing option that balances the sweetness and offers a bright, palate-cleansing note.
Creative Ways to Present
Why not turn your Homemade Red Velvet Cheesecake Recipe into a show-stopping centerpiece? Serve slices on elegant dessert plates with a spoonful of berry compote on the side. Or, for a fun twist, make mini cheesecakes using small springform pans or ramekins—perfect for parties or gifts. You could also layer the cheesecake filling with crushed Oreos and frosting in clear glasses for sophisticated red velvet parfaits. The possibilities are endless and sure to wow your guests.
Make Ahead and Storage
Storing Leftovers
To keep your cheesecake fresh, store any leftovers in an airtight container in the refrigerator. It will maintain its creamy texture and delicious flavor for up to 4 days. Be sure to cover it tightly to prevent it from absorbing any odors from other foods.
Freezing
This Homemade Red Velvet Cheesecake Recipe also freezes well if you want to save some for later. Wrap the cheesecake (whole or sliced) tightly in plastic wrap and then in aluminum foil before placing it in the freezer. It will keep for up to 2 months. When you’re ready to enjoy, thaw it overnight in the refrigerator for best texture and flavor.
Reheating
Cheesecake is best served chilled, so reheating isn’t usually necessary. However, if you prefer it at room temperature, simply let slices sit out for 15-20 minutes before serving. Avoid microwave reheating, as it can alter texture and make the cheesecake too soft or unevenly warm.
FAQs
Can I use another crust instead of Oreo cookies?
Absolutely! While the Oreo crust adds a wonderful chocolate crunch, you can substitute it with graham cracker crumbs, chocolate wafer crumbs, or even a nut-based crust depending on your preference. Just remember to adjust the butter quantity accordingly to make sure the crust holds together well.
Is the red food coloring necessary?
The red food coloring is essential if you want that classic, vibrant red velvet appearance. You can use either gel or liquid food coloring, but gels tend to provide a more intense color without thinning the batter.
Can I make this cheesecake dairy-free or vegan?
This recipe relies heavily on cream cheese, sour cream, and butter for its texture and flavor, so converting it to dairy-free or vegan would require significant substitutions with plant-based alternatives. While possible, it’s best to find a recipe specifically designed for those diets for optimal results.
Why do I use a water bath for baking?
The water bath creates a moist baking environment that prevents the cheesecake from cracking and promotes even cooking. It helps maintain a gentle heat around the cake so it sets beautifully without drying out.
How long does the Homemade Red Velvet Cheesecake Recipe take from start to finish?
This recipe requires patience—the active prep and bake time is about 1 hour and 22 minutes, but with the critical chilling time included, plan on around 5 hours and 25 minutes total before serving for the best results.
Final Thoughts
If you’re looking to craft a dessert that’s as beautiful as it is delicious, the Homemade Red Velvet Cheesecake Recipe is your ticket to sweet success. Combining the luxuriously creamy cheesecake texture with the rich, classic flavors of red velvet and a crunchy Oreo crust gives you a treat that everyone will rave about. So gather your ingredients, embrace the process, and get ready to enjoy a slice of pure joy that’s perfect for any occasion.
Print
Homemade Red Velvet Cheesecake Recipe
- Prep Time: 5 hours 25 minutes
- Cook Time: 1 hour 17 minutes
- Total Time: 6 hours 42 minutes
- Yield: 12 servings
- Category: Dessert
- Method: Baking
- Cuisine: American
Description
This Homemade Red Velvet Cheesecake combines the rich, creamy texture of classic cheesecake with the deep flavor and vibrant color of red velvet. Featuring a crunchy Oreo cookie crust, a smooth cocoa-infused cheesecake filling enhanced with sour cream and a splash of vinegar, and finished with a luscious cream cheese frosting, this recipe is perfect for special occasions or indulgent dessert lovers.
Ingredients
Crust
- 2 ½ cups (250 g) crushed Oreo cookies (about 30 cookies)
- 5 tablespoons unsalted butter, melted
Cheesecake Filling
- 32 ounces (908 g) cream cheese, softened
- 1 ⅓ cups (267 g) granulated sugar
- ½ cup (42 g) cocoa powder
- 1 cup (227 g) sour cream, room temperature
- 1 tablespoon white vinegar
- 1 tablespoon vanilla extract
- 1–2 ounces red food coloring
- 4 large eggs, room temperature, lightly beaten
Frosting
- 4 ounces (113 g) cream cheese, softened
- ¼ cup (56 g) unsalted butter, softened
- 2 cups (260 g) confectioners’ sugar
- 1 teaspoon vanilla extract
Instructions
- Prepare Oven and Pan: Preheat your oven to 350°F (175°C). Wrap the bottom of a 9-inch springform pan with two layers of heavy-duty aluminum foil to prevent water leakage during the water bath baking.
- Make the Crust: Combine the crushed Oreo cookies with the melted unsalted butter in a bowl. Press this mixture firmly into the bottom and up the sides of the prepared springform pan to form the crust. Bake for 10 minutes, then remove and allow it to cool.
- Prepare the Cheesecake Filling: Reduce the oven temperature to 300°F (150°C). In a large bowl, beat the softened cream cheese until smooth and creamy. Gradually add the granulated sugar and cocoa powder, mixing well after each addition. Incorporate the sour cream, white vinegar, vanilla extract, and red food coloring. Gently fold in the lightly beaten eggs until just combined, taking care not to overmix.
- Assemble and Bake: Pour the cheesecake batter over the cooled Oreo crust in the springform pan. Place the pan inside a larger roasting pan and pour boiling water into the outer pan until it reaches halfway up the sides of the springform pan, creating a water bath (bain-marie) for even baking. Bake for 1 hour. Once done, turn off the oven and leave the cheesecake in the water bath inside the oven for another hour to prevent cracks and ensure a creamy texture.
- Cool and Chill: Remove the springform pan from the water bath and place it on a wire rack to cool completely. After it reaches room temperature, refrigerate the cheesecake for at least 4 hours, preferably overnight, to set properly.
- Prepare Frosting and Serve: Beat the softened cream cheese and butter together until creamy and smooth. Gradually mix in the confectioners’ sugar and vanilla extract until the frosting is well blended. Spread this frosting evenly over the chilled cheesecake before slicing and serving.
Notes
- Wrapping the springform pan with heavy-duty foil is essential to prevent water from leaking into the crust during the water bath baking.
- Using room temperature ingredients like cream cheese, eggs, and sour cream ensures a smooth, lump-free batter.
- The water bath method helps to bake the cheesecake evenly and prevents cracks.
- You can adjust the amount of red food coloring for your desired intensity of color.
- For best results, chill the cheesecake overnight before frosting and serving.
- Store leftovers covered in the refrigerator for up to 3-4 days.


